Love this? Save it for later!
Share the inspiration with your friends
“You know that moment when you’re craving that smoky, sweet crunch of grilled corn on the cob, but it’s pouring outside or you just don’t have a grill?” That was me last summer on a random Thursday evening. I had guests coming over and was set on serving charred corn, but Mother Nature had other plans. Honestly, I almost gave up until I remembered something my college roommate casually mentioned about stovetop charred corn.
At first, I was skeptical—how could a regular pan replicate that perfect smoky char without an outdoor grill? The idea seemed almost too good to be true. But after a bit of trial, error, and yes, some minor kitchen chaos (spilling butter is practically a given when you’re juggling pots and pans), I landed on this foolproof method. It’s straightforward enough for first-timers and yields corn on the cob that’s charred just right—crispy edges with juicy, tender kernels inside.
Maybe you’ve been there too, craving that classic summer side but stuck inside or without fancy equipment. This recipe stuck with me because it’s simple, no-fuss, and perfectly delivers that nostalgic outdoor cookout vibe without stepping outside. Plus, it’s quick enough to whip up on a weeknight when you want something special but don’t want to fuss over complicated grilling techniques. Let me tell you, once you try this, you’ll never think stovetop corn is “just a backup” again.
Why You’ll Love This Recipe
After testing this stovetop charred corn on the cob recipe over several seasons and sharing it with friends, I can confidently say it’s a keeper for multiple reasons:
- Quick & Easy: Ready in under 20 minutes, it’s perfect for those spontaneous cravings or last-minute guests.
- Simple Ingredients: No need for fancy sauces or hard-to-find spices—just corn, butter, and a few pantry staples you probably already have.
- Perfect for Any Occasion: Whether it’s a cozy dinner at home, a casual BBQ, or a summer potluck, this corn fits right in without stealing the spotlight.
- Crowd-Pleaser: Kids love the smoky sweetness, and adults appreciate the balance of char and juiciness—everyone asks for seconds.
- Unbelievably Delicious: The secret technique of charring the corn directly on the stovetop pan brings out a depth of flavor that’s often missing from boiled or microwaved corn.
This isn’t just another corn recipe. What sets it apart is the way the kernels blister and caramelize right in the pan, giving you a perfect marriage of smoky, sweet, and buttery notes. And honestly, the method is so straightforward, even those who’ve never grilled or charred anything can feel like pros. It’s a recipe that makes you pause and savor the first bite—the kind that makes you close your eyes and smile.
What Ingredients You Will Need
This recipe uses simple, wholesome ingredients to deliver bold flavor and satisfying texture without the fuss. Most of these are pantry staples, and the fresh corn is the star.
- Fresh Corn on the Cob: 4 ears, husked and cleaned (look for plump kernels, ideally from your local farmer’s market or grocery store)
- Unsalted Butter: 3 tablespoons, softened (I prefer KerryGold for its rich flavor)
- Olive Oil: 1 tablespoon (helps with even charring and prevents sticking)
- Salt: 1 teaspoon, or to taste (kosher salt works best for seasoning)
- Black Pepper: Freshly ground, about ½ teaspoon (adds a subtle heat)
- Smoked Paprika: ½ teaspoon (optional, for an extra smoky kick)
- Lime Wedges: For serving (adds a bright contrast to the charred sweetness)
If fresh corn isn’t in season, frozen corn still works in a pinch but won’t have quite the same texture or flavor. For a dairy-free version, swap butter with coconut oil or your favorite vegan butter substitute. You can also sprinkle chopped fresh herbs like cilantro or parsley for a fresh finish.
Equipment Needed
- Heavy-Bottomed Skillet or Cast Iron Pan: Essential for even heat and good charring. I have a trusty Lodge cast iron that never disappoints.
- Tongs: For turning the corn safely without burning your fingers.
- Small Mixing Bowl: To soften and mix the butter with spices before spreading.
- Kitchen Towel or Oven Mitts: Handling hot corn requires care—don’t skip this!
If you don’t have cast iron, a heavy stainless steel pan works too, but nonstick pans won’t give you the same char. For budget-friendly options, thrift stores often have cast iron skillets that just need a little seasoning. Keeping your skillet well-seasoned will make charring easier and help prevent sticking.
Preparation Method
- Prepare the Corn: Husk and thoroughly clean 4 ears of fresh corn. Remove all silk threads—it’s tedious but worth it for a clean finish. Pat dry with a kitchen towel.
- Make the Spiced Butter: In a small bowl, combine 3 tablespoons softened unsalted butter with 1 teaspoon salt, ½ teaspoon freshly ground black pepper, and ½ teaspoon smoked paprika (optional). Mix well until smooth. Set aside.
- Heat the Pan: Place your cast iron or heavy skillet over medium-high heat. Add 1 tablespoon olive oil and swirl to coat. Let the pan get hot enough that a drop of water sizzles on contact (about 2-3 minutes).
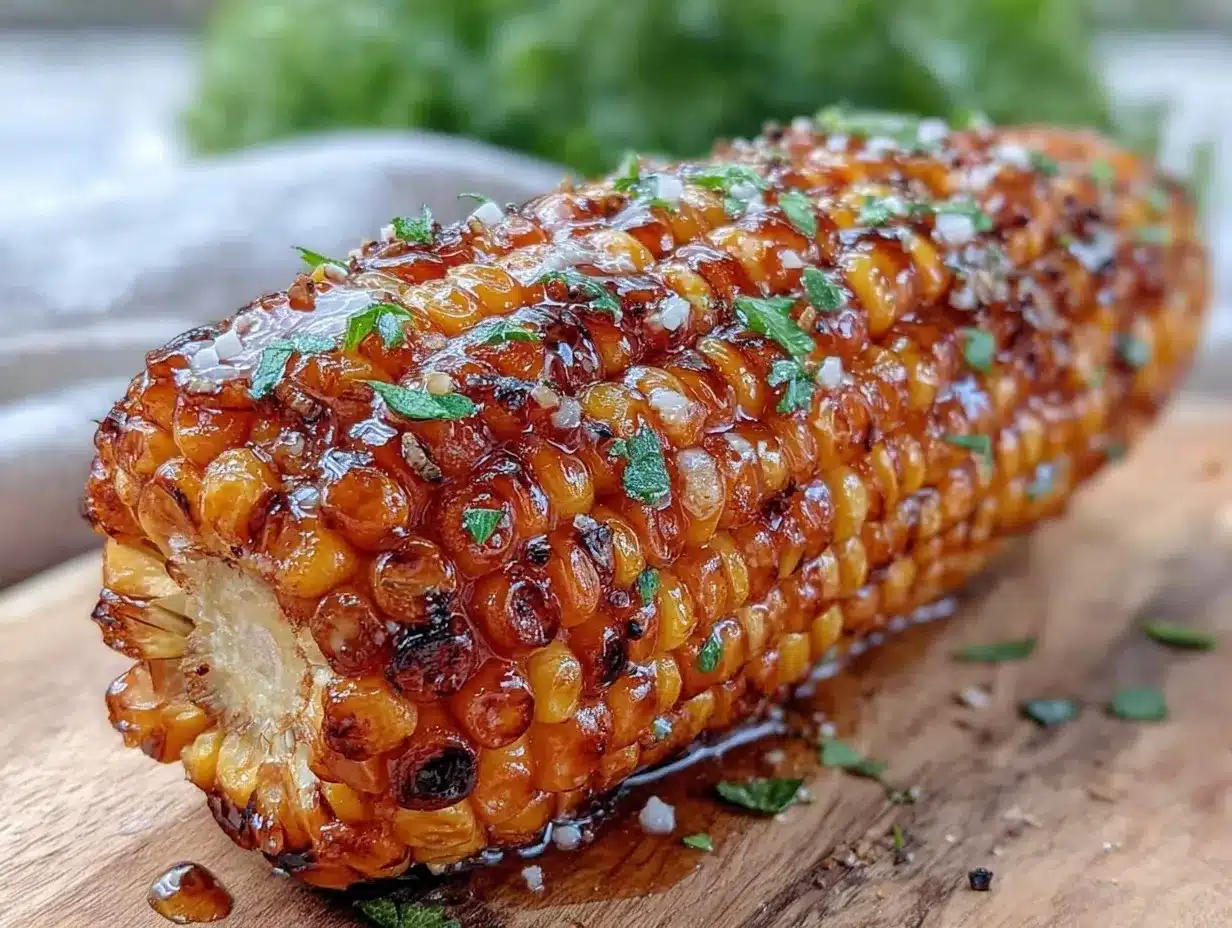
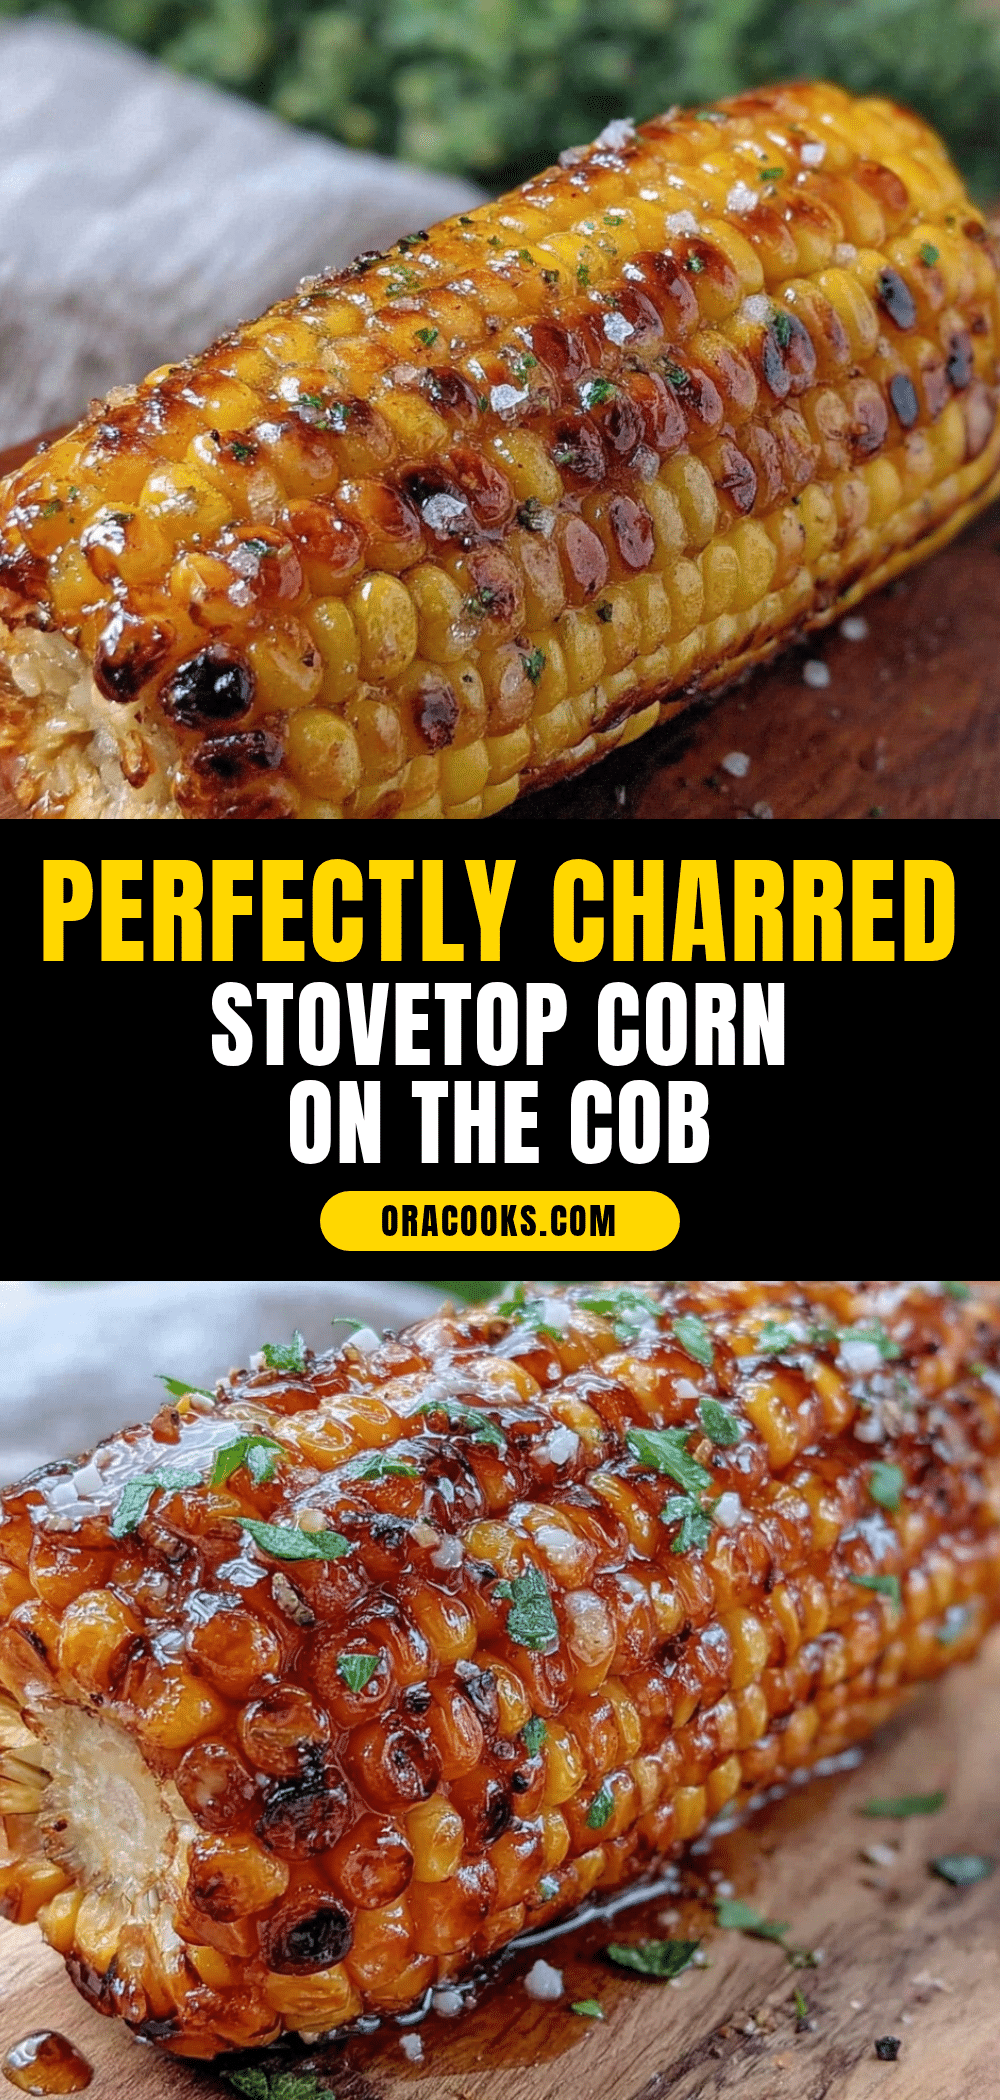
- Char the Corn: Place the corn ears directly into the hot skillet. Let them cook undisturbed for about 3-4 minutes. You’re aiming for blistered, golden brown spots. Use tongs to gently rotate the corn every 3-4 minutes to char all sides evenly. Total cooking time should be about 12-15 minutes. The kernels should look blistered and slightly blackened in spots but still plump and juicy.
- Apply Butter: Once the corn is nicely charred, remove it from the skillet and immediately brush the spiced butter mixture all over while the corn is hot. This helps the butter melt perfectly and soak into the kernels.
- Serve: Finish with a squeeze of fresh lime juice over each ear. Serve immediately for the best texture and flavor.
Pro tip: If your corn is browning unevenly, lower the heat slightly and be patient. Rushing this step can lead to burnt spots without proper charring elsewhere. Also, keep a paper towel handy—you might get a little buttery splash (I certainly did on my first try!).
Cooking Tips & Techniques
Getting that perfect stovetop char takes a bit of finesse, but once you get the hang of it, it’s a breeze.
- Use Medium-High Heat: Too hot and the corn chars too fast on one side, too low and you miss the blistering effect.
- Rotate Frequently: Turning the corn every 3-4 minutes helps achieve an even char all around.
- Don’t Overcrowd the Pan: Leave enough space for heat to circulate; otherwise, you’ll steam the corn instead of charring it.
- Patience is Key: Let the corn sit on each side long enough to build up color. Resist the urge to poke or prod too soon.
- Butter at the End: Applying spiced butter after charring keeps the kernels juicy and adds flavor without risking burning the butter.
I remember the first time I tried charring corn on the stovetop; I cranked the heat too high and ended up with burnt patches and raw kernels on top—lesson learned! Now I keep the heat steady and trust the process, turning the corn gently and enjoying that satisfying sizzle sound. It’s honestly one of those kitchen moments that makes you feel like a pro cook.
Variations & Adaptations
This stovetop charred corn on the cob recipe is super versatile, so feel free to mix it up:
- Spicy Kick: Add a pinch of cayenne or chili powder to the butter for a smoky heat that wakes up your taste buds.
- Herb Infusion: Mix chopped fresh herbs like cilantro, parsley, or basil into the butter for a fresh twist.
- Cheesy Finish: After buttering, sprinkle crumbled cotija or Parmesan cheese on top for a Mexican street corn vibe without the mayo.
- Grain-Free Option: Swap regular butter for ghee or coconut oil to keep it paleo-friendly while maintaining richness.
- Air Fryer Adaptation: You can replicate charring by air frying husked corn at 400°F (200°C) for 10-12 minutes, turning halfway through, then finishing with the spiced butter.
One time, I tossed in a little garlic powder into the butter mix and it became an instant favorite for a dinner party. Honestly, the variations let you customize the corn to your mood or occasion.
Serving & Storage Suggestions
Serve this charred corn hot for the best experience—warm kernels bursting with buttery, smoky flavor are hard to beat. A squeeze of fresh lime or a sprinkle of flaky sea salt adds a bright finish. It pairs beautifully with grilled meats, fresh salads, or even as a snack alongside crispy garlic chicken for a simple but satisfying meal.
If you have leftovers (which is rare!), wrap the corn tightly in foil and store in the refrigerator for up to 2 days. Reheat gently in a skillet over low heat or in the microwave, but be careful not to overcook or the kernels might dry out.
Flavors deepen after sitting a few hours, so if you prep the corn in advance, just reheat and add fresh butter before serving for that just-cooked feel.
Nutritional Information & Benefits
This stovetop charred corn on the cob offers a satisfying treat without heavy calories. Each ear provides roughly 90-110 calories, mostly from natural carbs and a bit of butter fat. Corn is a good source of fiber, vitamins B and C, and antioxidants like lutein and zeaxanthin, which support eye health.
Using unsalted butter lets you control sodium, and the option to swap to dairy-free fats makes it accessible for different dietary needs. It’s naturally gluten-free and can be part of a balanced diet when enjoyed in moderation.
Eating this corn reminds me of simple wholesome meals that nourish both body and soul—it’s comfort food that doesn’t weigh you down.
Conclusion
If you’ve been hesitant about making charred corn without a grill, this recipe will show you how easy and rewarding stovetop charring can be. It’s approachable for first-timers and delivers that unmistakable smoky-sweet flavor we all crave.
Feel free to tweak the spices and butter mix to suit your taste, and don’t be afraid of a little mess—it’s all part of the fun. I keep coming back to this recipe because it’s quick, reliable, and honestly, it just tastes like summer in every bite.
Give it a try, and let me know how your stovetop charred corn turns out—I love hearing about your kitchen wins and twists!
FAQs
Can I use frozen corn for stovetop charring?
Frozen corn can be used, but it won’t char as well as fresh ears. If you try it, pat the kernels dry and cook without overcrowding the pan to avoid steaming.
What if I don’t have a cast iron skillet?
A heavy-bottomed stainless steel pan works as a good alternative. Avoid nonstick pans as they won’t develop the same charred texture.
How do I know when the corn is perfectly charred?
Look for blistered, blackened spots evenly distributed over the kernels without burning the entire ear. The corn should smell smoky and feel tender when pierced.
Can I prepare the spiced butter in advance?
Yes! Making the butter ahead saves time. Keep it chilled and bring to room temperature before spreading on hot corn for best melting.
What are some good side dishes to serve with charred corn on the cob?
This corn pairs wonderfully with grilled meats, fresh salads, and dishes like roasted vegetable quinoa or even a light soup for a balanced meal.
Pin This Recipe!
Perfect Stovetop Charred Corn on the Cob
A quick and easy stovetop method to achieve smoky, sweet, and perfectly charred corn on the cob without a grill. Ideal for first-timers and perfect for any occasion.
- Prep Time: 10 minutes
- Cook Time: 15 minutes
- Total Time: 25 minutes
- Yield: 4 servings 1x
- Category: Side Dish
- Cuisine: American
Ingredients
- 4 ears fresh corn on the cob, husked and cleaned
- 3 tablespoons unsalted butter, softened
- 1 tablespoon olive oil
- 1 teaspoon salt (kosher salt preferred)
- ½ teaspoon freshly ground black pepper
- ½ teaspoon smoked paprika (optional)
- Lime wedges, for serving
Instructions
- Husk and thoroughly clean 4 ears of fresh corn. Remove all silk threads and pat dry with a kitchen towel.
- In a small bowl, combine 3 tablespoons softened unsalted butter with 1 teaspoon salt, ½ teaspoon freshly ground black pepper, and ½ teaspoon smoked paprika (optional). Mix well until smooth and set aside.
- Place a cast iron or heavy-bottomed skillet over medium-high heat. Add 1 tablespoon olive oil and swirl to coat. Heat until a drop of water sizzles on contact, about 2-3 minutes.
- Place the corn ears directly into the hot skillet. Cook undisturbed for 3-4 minutes until blistered and golden brown spots appear.
- Use tongs to gently rotate the corn every 3-4 minutes to char all sides evenly. Total cooking time should be about 12-15 minutes until kernels are blistered and slightly blackened but still plump and juicy.
- Remove corn from skillet and immediately brush with the spiced butter mixture while hot to allow melting and absorption.
- Serve immediately with a squeeze of fresh lime juice over each ear.
Notes
Use medium-high heat and rotate corn every 3-4 minutes for even charring. Avoid overcrowding the pan to prevent steaming. Apply butter after charring to keep kernels juicy. For dairy-free, substitute butter with coconut oil or vegan butter. Frozen corn can be used but will not char as well.
Nutrition
- Serving Size: 1 ear of corn
- Calories: 100
- Sugar: 6
- Sodium: 230
- Fat: 7
- Saturated Fat: 4
- Carbohydrates: 12
- Fiber: 2
- Protein: 3
Keywords: stovetop charred corn, corn on the cob, easy corn recipe, grilled corn alternative, smoky corn, summer side dish