Love this? Save it for later!
Share the inspiration with your friends
“I wasn’t even planning to bake that day,” I admit, laughing a little as I remember the chaos of that sweltering July afternoon. The power flickered—typical summer storm stuff—and suddenly the oven was out of commission. I had promised to bring dessert to a neighborhood potluck in less than two hours. Panic? Absolutely. But then, I spotted a box of Bomb Pops hiding in the freezer, half-melted and looking a bit sad. That’s when the idea hit me: what if I turned these nostalgic popsicles into a frozen cake? Honestly, I wasn’t sure it would work, but the thought of a no-bake, no-heat dessert was too good to pass up.
So, I grabbed a few simple ingredients and improvised my way to what became my new favorite summer treat: the Easy Bomb Pop Popsicle Cake No-Bake Frozen Dessert. It’s refreshing, colorful, and ridiculously easy—perfect for days when you want something cool and sweet without turning on the oven or standing over a stove. Maybe you’ve been there too, scrambling last minute but hoping to impress without stress. This recipe stuck with me because it’s the kind of dessert that brings back childhood memories with a grown-up twist, and it’s just plain fun to make.
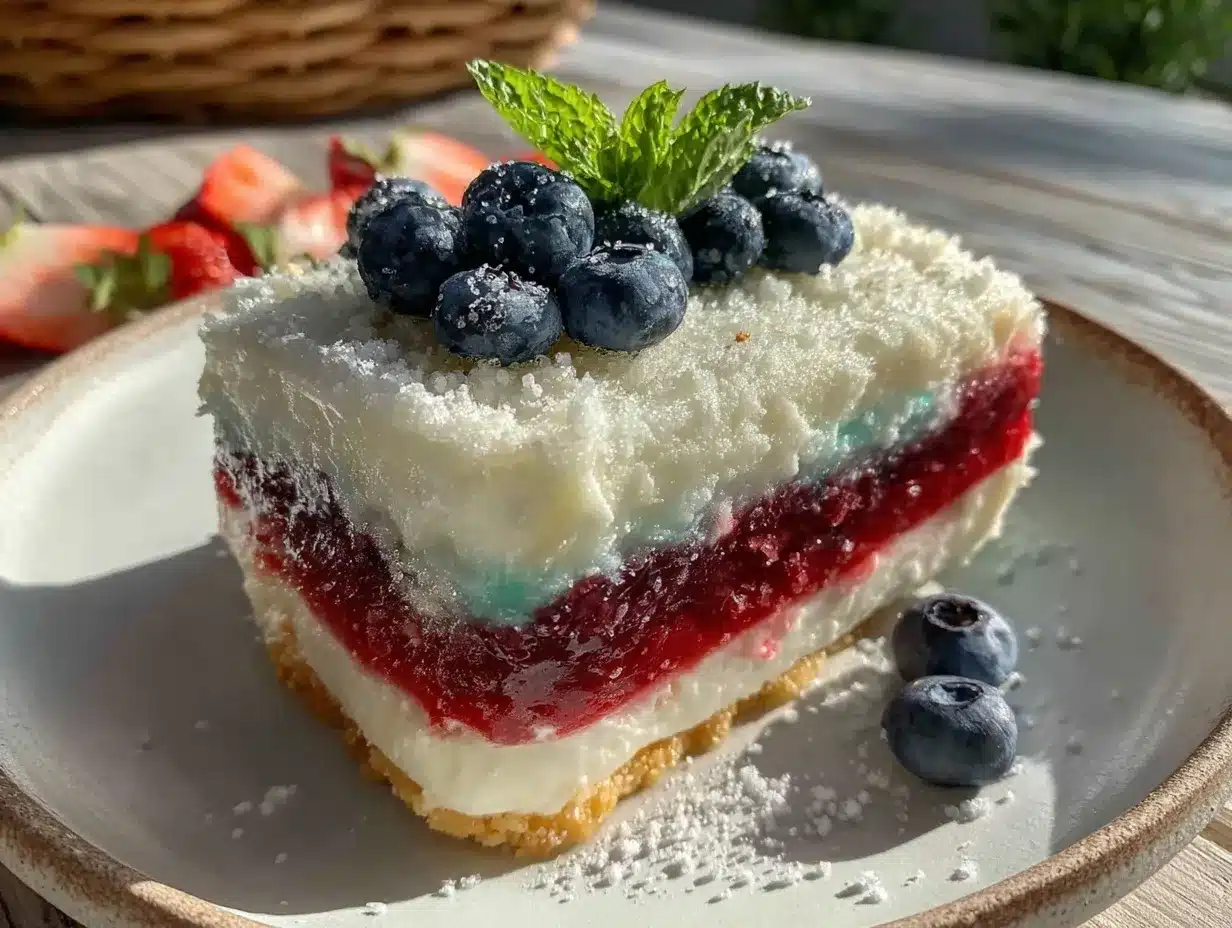
Let me tell you, this popsicle cake is a crowd-pleaser, and the way the vibrant red, white, and blue layers melt together is honestly kind of mesmerizing. Plus, it’s a total lifesaver for those hot summer days when you want dessert but don’t want to sweat through the process. So grab your freezer space and let’s get to it—you’ll want to keep this one in your summer recipe arsenal.
Why You’ll Love This Recipe
After testing various versions of frozen desserts, the Easy Bomb Pop Popsicle Cake quickly rose to the top as a reliably delicious, hassle-free treat. Here’s why it’s a winner in my book:
- Quick & Easy: Comes together in under 30 minutes, perfect for those last-minute celebrations or spontaneous cravings.
- Simple Ingredients: No complicated grocery runs needed. Most ingredients are pantry staples or easy to find at any store.
- Perfect for Summer Parties: Whether it’s a backyard barbecue or a casual potluck, this no-bake frozen dessert shines as a festive centerpiece.
- Crowd-Pleaser: Kids and adults alike rave about the nostalgic Bomb Pop flavor combined with creamy layers.
- Unbelievably Delicious: The creamy, icy texture combo is refreshing and satisfying—like the best summer treat you never knew you needed.
What sets this recipe apart is the clever layering technique that keeps the Bomb Pop’s iconic red, white, and blue colors distinct yet beautifully melding. I even tried swapping out the traditional popsicles for sugar-free options, and it still came out fantastic. It’s not just a popsicle on a stick anymore—it’s a grown-up dessert with a playful spirit. Honestly, after the first bite, you might close your eyes and remember those long summer days, but this cake brings that feeling with a smoother, creamier twist.
What Ingredients You Will Need
This recipe uses simple, wholesome ingredients to deliver bold flavor and satisfying texture without the fuss. Most of these are pantry staples, and the Bomb Pops themselves are the star ingredient, of course.
- Bomb Pop Popsicles: About 6-8 popsicles (standard size), slightly softened for easy layering. I recommend the classic red, white, and blue for that iconic look.
- Graham Cracker Crust:
- 1 ½ cups graham cracker crumbs (about 12 full sheets, crushed finely)
- ⅓ cup unsalted butter, melted (use a quality butter like Kerrygold for best flavor)
- 2 tablespoons granulated sugar (optional, for extra sweetness)
- Cream Layer:
- 1 cup heavy cream, cold
- 8 oz cream cheese, softened (Philadelphia brand is my go-to for smoothness)
- ½ cup powdered sugar
- 1 teaspoon pure vanilla extract
- Optional Garnishes: Fresh berries (blueberries, strawberries), mint leaves for a pop of color
Pro tip: If you want to make this dairy-free, swap the heavy cream and cream cheese for coconut cream and a dairy-free cream cheese alternative. For gluten-free, use gluten-free graham crackers or crushed gluten-free cookies instead.
Equipment Needed
- Springform Pan (9-inch): Ideal for easy removal without messing up your cake layers. If you don’t have one, a regular round cake pan lined with parchment paper works fine too.
- Mixing Bowls: At least two – one for the crust, another for the cream layer.
- Electric Mixer or Hand Whisk: To whip the cream and blend the cream cheese smoothly. I find a hand mixer saves time and effort, but a whisk works if you’re patient.
- Spatula: For folding and smoothing layers.
- Measuring Cups and Spoons: Precision matters for texture and flavor balance.
- Plastic Wrap or Aluminum Foil: To cover the cake while it freezes.
I remember once trying to press the crust with a fork instead of a flat-bottomed cup and it took forever to get it even—so, a flat-bottomed glass or measuring cup is a handy little trick for compacting the crust evenly. Also, keeping the cream and cream cheese cold before mixing helps get that fluffy, smooth texture every time.
Preparation Method
- Prepare the Crust (10 minutes): In a mixing bowl, combine the graham cracker crumbs, melted butter, and sugar. Stir until the mixture looks like wet sand. Press it firmly into the bottom of your springform pan using the bottom of a measuring cup or glass to create an even layer. Set aside.
- Soften the Bomb Pops (5 minutes): Remove the Bomb Pops from their sticks and place them in a shallow bowl. Let them sit at room temperature for about 5 minutes until slightly softened but not melted. This makes layering easier without losing the shape.
- Make the Cream Layer (15 minutes): In a chilled bowl, beat the cold heavy cream with an electric mixer until stiff peaks form. In another bowl, beat the softened cream cheese, powdered sugar, and vanilla extract until smooth and creamy. Gently fold the whipped cream into the cream cheese mixture until fully combined. This will be your fluffy, smooth middle layer.
- Assemble the Cake (10 minutes): Spread half of the cream mixture evenly over the graham cracker crust. Next, arrange the softened Bomb Pop pieces on top of the cream layer, trying to keep the red, white, and blue colors distinct for a fun visual effect. Pour the remaining cream mixture over the popsicles and gently smooth the top with a spatula.
- Freeze (At least 4 hours, preferably overnight): Cover the cake tightly with plastic wrap or foil and place it in the freezer. The longer it freezes, the firmer it will be and the flavors will meld beautifully.
- Serve: To serve, remove the sides of the springform pan carefully. Let the cake sit at room temperature for about 5-10 minutes to soften slightly for easier slicing. Garnish with fresh berries or mint leaves if desired.
Troubleshooting tip: If the cake seems too hard to slice, a warm, damp knife helps make clean cuts without cracking the layers. Also, don’t skip softening the Bomb Pops a bit—they hold their shape better and layer more evenly.
Cooking Tips & Techniques
Let me share some insider tips I’ve learned after a few trial runs with this Easy Bomb Pop Popsicle Cake:
- Softening Popsicles: Timing is everything here. If they’re too frozen, they’ll crack the cream layer when you press them in. Too soft, and they’ll melt into a colorful mess. I usually set a timer for 5 minutes and check—sometimes it’s a little longer depending on your kitchen temperature.
- Whipping the Cream: Make sure your bowl and beaters are cold to get the best volume. I pop mine in the fridge while prepping other ingredients.
- Folding Technique: When combining whipped cream with cream cheese, fold gently using a spatula instead of stirring vigorously. This keeps the mixture light and airy.
- Crust Pressing: Compact the graham cracker crust firmly to avoid crumbling when slicing. I like using the bottom of a sturdy glass to press down evenly.
- Freezing Time: Don’t rush the freeze! The cake needs at least four hours but overnight is best for clean slices and perfect texture.
One time, I skipped chilling the cream cheese and ended up with a lumpy cream layer—lesson learned the hard way. Also, multitask by prepping the crust and cream layers while the popsicles soften, it saves a ton of time. And honestly, the colors and layers come together so beautifully that even imperfect slices look impressive.
Variations & Adaptations
This recipe is surprisingly flexible, allowing you to tailor it to your taste or dietary needs without losing that bomb pop charm.
- Dairy-Free Version: Use coconut cream instead of heavy cream and a dairy-free cream cheese substitute. This keeps the cream layer luscious and rich without dairy.
- Flavor Swaps: Instead of classic Bomb Pops, try using other layered popsicles like orange creamsicle or tropical fruit flavors for a different twist.
- Gluten-Free Crust: Swap graham crackers for gluten-free cookies or crushed nuts mixed with coconut oil for a nutty crust.
- Mini Cakes: Make individual portions using a muffin tin lined with plastic wrap—perfect for parties or portion control.
- Adult Version: Add a splash of your favorite liqueur like triple sec or rum into the cream layer for a grown-up kick. I tried this for a Fourth of July gathering and it was a hit.
Feel free to get creative with toppings too—some toasted coconut or a drizzle of chocolate sauce adds a nice texture and flavor contrast. Personally, I love adding fresh blueberries on top for a pop of freshness that balances the sweetness.
Serving & Storage Suggestions
This Easy Bomb Pop Popsicle Cake is best served chilled but not rock solid. Let it sit out for about 5-10 minutes before slicing so the cream softens just enough to cut smoothly. For presentation, I like to decorate with fresh summer berries—blueberries and sliced strawberries are perfect—and a sprig of mint to brighten the plate.
Pair this frozen dessert with a light, citrusy drink like sparkling lemonade or iced tea for a refreshing summer combo. It also makes a fantastic finale to a casual barbecue or picnic.
Store leftovers wrapped tightly in plastic wrap or in an airtight container in the freezer for up to 5 days. When reheating, just let the slices thaw in the fridge for about 15-20 minutes before serving. The flavors meld even more after a day, so it’s great made ahead!
Nutritional Information & Benefits
While this dessert is definitely a treat, it’s lighter than many traditional cakes thanks to the no-bake, frozen nature and use of fruit-based popsicles.
- Approximate calories per serving (based on 12 slices): 180-220 kcal
- Contains dairy and gluten (can be modified for dairy-free and gluten-free)
- Key nutrients come from the cream cheese (protein, calcium) and fruit from the Bomb Pops (vitamin C)
- Lower in added sugars compared to many ice cream cakes
From a wellness perspective, this dessert hits that nostalgic sweet spot without feeling heavy or overly rich. It’s a dessert you can enjoy without feeling like you need a nap afterward, which honestly is a win in my book.
Conclusion
The Easy Bomb Pop Popsicle Cake No-Bake Frozen Dessert is one of those recipes that feels like summer captured in a slice. It’s straightforward, playful, and packed with that childhood charm, yet it manages to look impressive and taste fantastic every time. I love it because it’s forgiving, quick, and just plain fun to make.
If you give this cake a try, don’t hesitate to tweak it to suit your tastes—whether that means swapping out flavors, trying different crusts, or adding your own twist on toppings. I’d really love to hear how you make it your own, so please share your experience or any adaptations in the comments below. Let this no-bake frozen dessert become your go-to for those hot days when you want a sweet treat without the heat or hassle.
Here’s to many cool, colorful summer moments with this easy, delightful Bomb Pop cake!
FAQs
Can I make this cake without a springform pan?
Yes! A regular cake pan lined with parchment paper works fine. Just be extra careful when removing the cake, and consider serving it directly from the pan to avoid breaking the layers.
How long can I store the popsicle cake in the freezer?
You can store it up to 5 days wrapped tightly in plastic wrap or in an airtight container. For best texture and flavor, consume within this timeframe.
Can I use other popsicle flavors besides Bomb Pops?
Absolutely! Any layered or solid fruit-flavored popsicles work well. Just keep in mind the visual effect might change depending on the colors and flavors.
What’s the best way to slice the frozen cake?
Use a sharp knife warmed under hot water, then dried, to make clean, smooth cuts. Let the cake sit at room temperature for 5-10 minutes before slicing for best results.
Is there a vegan version of this dessert?
Yes! Use dairy-free cream cheese and coconut cream instead of dairy products, and choose vegan popsicles. The crust can be made with vegan cookies and plant-based butter substitutes.
PrintEasy Bomb Pop Popsicle Cake Recipe Perfect No-Bake Frozen Dessert
A refreshing, colorful, and easy no-bake frozen dessert that layers nostalgic Bomb Pop popsicles with a creamy filling and graham cracker crust. Perfect for summer parties and quick last-minute treats.
- Prep Time: 30 minutes
- Cook Time: 0 minutes
- Total Time: 4 hours 30 minutes
- Yield: 12 servings 1x
- Category: Dessert
- Cuisine: American
Ingredients
- 6–8 Bomb Pop Popsicles (standard size), slightly softened
- 1 ½ cups graham cracker crumbs (about 12 full sheets, crushed finely)
- ⅓ cup unsalted butter, melted
- 2 tablespoons granulated sugar (optional)
- 1 cup heavy cream, cold
- 8 oz cream cheese, softened
- ½ cup powdered sugar
- 1 teaspoon pure vanilla extract
- Optional garnishes: fresh berries (blueberries, strawberries), mint leaves
Instructions
- Prepare the crust: In a mixing bowl, combine graham cracker crumbs, melted butter, and sugar. Stir until mixture resembles wet sand. Press firmly into bottom of a 9-inch springform pan using the bottom of a measuring cup or glass to create an even layer. Set aside.
- Soften the Bomb Pops: Remove Bomb Pops from sticks and place in a shallow bowl. Let sit at room temperature for about 5 minutes until slightly softened but not melted.
- Make the cream layer: In a chilled bowl, beat cold heavy cream with an electric mixer until stiff peaks form. In another bowl, beat softened cream cheese, powdered sugar, and vanilla extract until smooth. Gently fold whipped cream into cream cheese mixture until fully combined.
- Assemble the cake: Spread half of the cream mixture evenly over the graham cracker crust. Arrange softened Bomb Pop pieces on top, keeping red, white, and blue colors distinct. Pour remaining cream mixture over popsicles and smooth the top with a spatula.
- Freeze: Cover cake tightly with plastic wrap or foil and freeze for at least 4 hours, preferably overnight.
- Serve: Remove sides of springform pan carefully. Let cake sit at room temperature for 5-10 minutes to soften slightly for easier slicing. Garnish with fresh berries or mint leaves if desired.
Notes
Softening the Bomb Pops for about 5 minutes is crucial to maintain shape and ease layering. Use a warm, damp knife to slice the frozen cake cleanly. For dairy-free, substitute heavy cream and cream cheese with coconut cream and dairy-free cream cheese. For gluten-free, use gluten-free graham crackers or cookies. Freeze overnight for best texture and flavor melding.
Nutrition
- Serving Size: 1 slice (1/12th of c
- Calories: 200
- Sugar: 14
- Sodium: 150
- Fat: 13
- Saturated Fat: 8
- Carbohydrates: 18
- Fiber: 0.5
- Protein: 3
Keywords: Bomb Pop, popsicle cake, no-bake dessert, frozen dessert, summer dessert, easy dessert, patriotic dessert, red white and blue dessert