Love this? Save it for later!
Share the inspiration with your friends
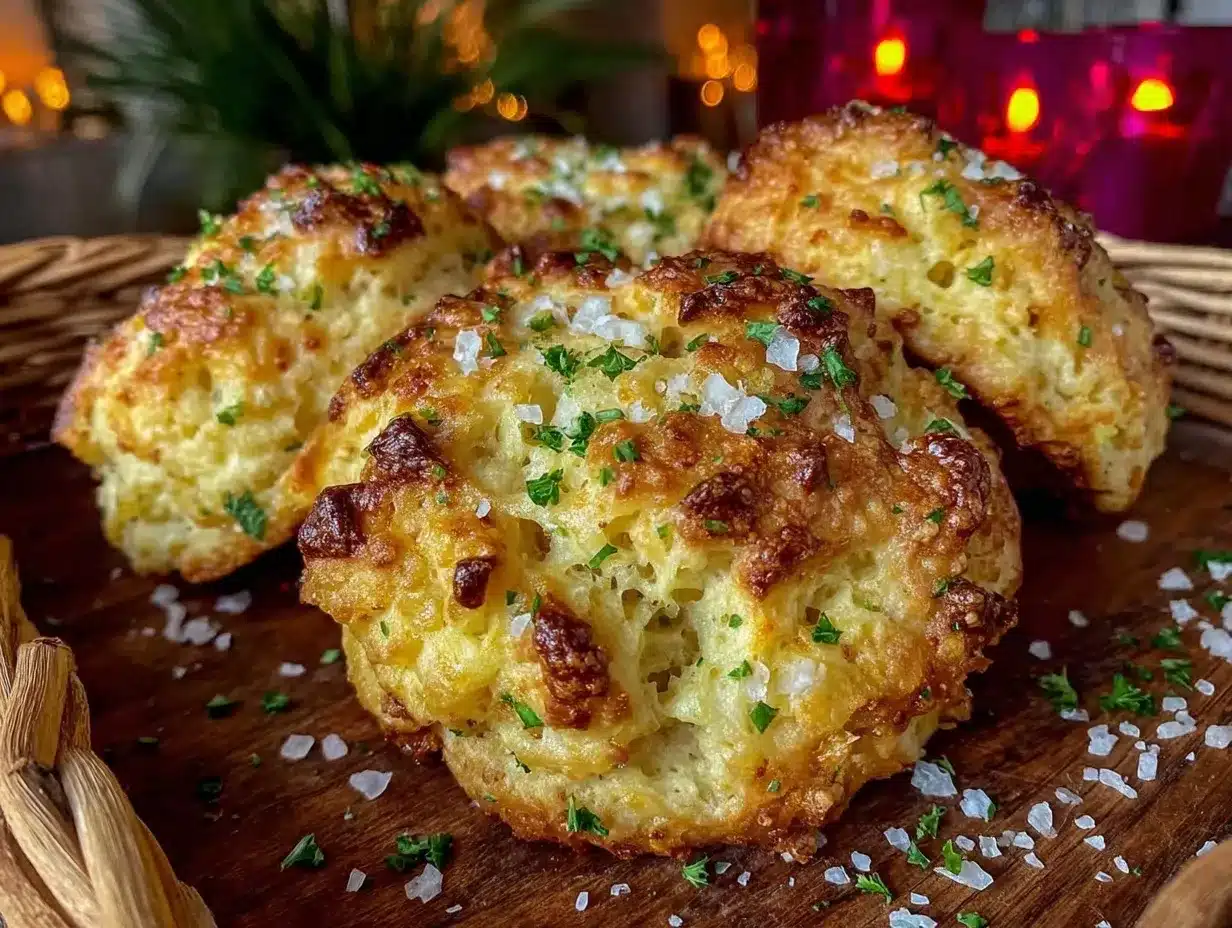
“You’ve got to try these biscuits,” my barista said one casual Thursday morning while handing me my usual latte. I was half-listening, already dreaming about the weekend. But then she described the buttery, garlicky, cheesy magic of Red Lobster Cheddar Bay Biscuits, and I was hooked. Honestly, I wasn’t expecting much from a coffee shop chat, but here I was scribbling down the recipe on a napkin as customers called for their orders.
Fast forward a few weeks, after several messy tries and a kitchen that looked like a flour bomb had exploded, I finally nailed my own crispy Red Lobster Cheddar Bay Biscuits. Let me tell you, the way the golden crust cracks under your fingers before revealing that soft, cheesy, garlicky center—wow. I think what really sold me was how simple the ingredients were, yet the flavor screams indulgence without any fuss.
Maybe you’ve been there: craving those iconic biscuits but tired of the drive-through or the chain restaurant hustle. I get it. This recipe stuck with me because it’s approachable, forgiving, and honestly, it’s the kind of comfort food that makes you close your eyes after the first bite. Plus, it’s perfect for making your weeknight dinners feel like a special occasion. So, let’s get into how you can make these crispy, cheesy delights right at home—without the wait or the mystery ingredients.
Why You’ll Love This Recipe
After testing countless versions of the Red Lobster Cheddar Bay Biscuits recipe, I found a few things that make this one stand out from the crowd. It’s not just a copycat—it’s my go-to biscuit for when I want that crispy outside and fluffy, cheesy inside every single time.
- Quick & Easy : Comes together in under 30 minutes, making it perfect for busy weeknights or those last-minute dinner plans.
- Simple Ingredients : You don’t need any fancy or hard-to-find items; most of these are pantry staples or easy to grab from your local store.
- Perfect for Entertaining : Whether it’s a casual family dinner or a weekend gathering, these biscuits always impress without the stress.
- Crowd-Pleaser : Kids to adults, everyone asks for seconds, and sometimes thirds—no joke.
- Unbelievably Delicious : The mix of sharp cheddar, fresh garlic, and buttery crust is downright addicting.
What really makes this recipe different is the way the biscuits get that perfect crispy edge without drying out. I use a combination of cold butter cut into the flour for tender layers, plus a little secret splash of garlic powder in the dough alongside fresh minced garlic for that extra punch. Honestly, it’s the kind of comfort food that feels like a warm hug but with a little bit of wow-factor.
So if you love crispy, cheesy biscuits but want to skip the restaurant lines, this recipe is for you. Trust me, once you try these, you’ll be making them over and over again.
What Ingredients You Will Need
This recipe calls for simple, wholesome ingredients that come together to create bold flavors and a satisfying texture. You’ll likely have most of these on hand, and substitutions are easy if needed.
- All-purpose flour – 2 cups (240 g), the base for tender, flaky biscuits.
- Baking powder – 1 tablespoon, for that perfect rise and fluffiness.
- Baking soda – ½ teaspoon, helps with leavening and browning.
- Salt – 1 teaspoon, balances the flavors.
- Granulated sugar – 1 tablespoon, just a hint of sweetness.
- Cold unsalted butter – 6 tablespoons (85 g), cut into small cubes (I recommend Kerrygold for best flavor).
- Sharp cheddar cheese – 1 cup (100 g), freshly shredded for melt and flavor (I prefer Tillamook or Cabot).
- Buttermilk – ¾ cup (180 ml), adds moisture and tang (substitute with milk plus 1 teaspoon lemon juice if needed).
- Garlic powder – 1 teaspoon, mixed into the dough for subtle garlic flavor.
- Fresh garlic – 1 clove, finely minced, folded into the biscuit topping for punch.
- Butter for brushing – ¼ cup (56 g), melted, mixed with garlic and parsley for that signature glaze.
- Fresh parsley – 2 tablespoons, finely chopped, adds freshness to the topping.
If you want to make these gluten-free, swapping the all-purpose flour for a gluten-free blend works well—just check the blend includes xanthan gum for structure. You can also try using dairy-free butter and coconut yogurt to make a dairy-free version, though the texture will be slightly different.
Equipment Needed
- Mixing bowls – One large for dry ingredients, one for wet.
- Baking sheet or cast iron skillet – I love using a cast iron skillet because it helps get that extra crispy crust.
- Pastry cutter or fork – To cut cold butter into the flour (or use your fingers, but keep the butter cold!).
- Measuring cups and spoons – For precise measurements.
- Grater – Freshly shred your cheddar cheese for best melt.
- Pastry brush – For brushing on the garlic butter glaze.
- Cooling rack – To let the biscuits cool slightly and keep that bottom crust crisp.
If you don’t have a pastry cutter, two forks or even a pair of butter knives work fine. For budget-friendly options, using a non-stick baking sheet lined with parchment paper is a solid alternative to cast iron. Just keep an eye on the biscuits’ bottoms to prevent over-browning. I’ve found that cleaning and drying my cast iron skillet right after use keeps it in tip-top shape for many batches.
Preparation Method
- Preheat your oven to 425°F (220°C) and position a rack in the middle. This high heat is key to that crispy, golden crust.
- Mix dry ingredients: In a large bowl, whisk together 2 cups (240 g) all-purpose flour, 1 tablespoon baking powder, ½ teaspoon baking soda, 1 teaspoon salt, 1 tablespoon sugar, and 1 teaspoon garlic powder.
- Cut in the butter: Add 6 tablespoons (85 g) cold, cubed unsalted butter to the dry mix. Use a pastry cutter or fork to blend until the mixture resembles coarse crumbs with pea-sized bits of butter. The cold butter creates flaky layers, so don’t skip chilling it.
- Stir in cheese: Fold in 1 cup (100 g) shredded sharp cheddar cheese evenly, making sure it’s well distributed.
- Add buttermilk: Pour in ¾ cup (180 ml) buttermilk and gently stir until just combined. The dough will be sticky—that’s okay. Overmixing will make the biscuits tough.
- Shape the dough: Turn the sticky dough onto a floured surface. Using floured hands, pat it into a 1-inch thick rectangle. Fold the dough over itself 2-3 times to create layers, then pat it back down to 1-inch thickness.
- Cut biscuits: Use a 2.5-inch round biscuit cutter dipped in flour to cut out biscuits. Press straight down without twisting to keep edges sharp for a good rise. Place biscuits close together on a greased baking sheet or cast iron skillet for softer sides, or spaced apart for crispier edges.
- Bake: Pop the biscuits in the oven for 12-15 minutes until golden brown on top and bottom. The kitchen will smell amazing!
- Prepare topping: While biscuits bake, melt ¼ cup (56 g) butter. Stir in 1 finely minced garlic clove and 2 tablespoons chopped fresh parsley.
- Brush biscuits: As soon as the biscuits come out, brush the garlic butter generously over the hot tops and sides for that signature flavor and sheen.
- Cool slightly: Let the biscuits rest on a cooling rack for 5 minutes before serving. This stops sogginess and keeps the outside crisp.
Pro tip: If the dough feels too sticky to handle, chill it for 10-15 minutes before shaping. Also, don’t rush the folding step—those layers are what give you that flaky texture. I once forgot to preheat my oven (don’t ask), and the biscuits turned out dense and sad, so trust me on that one!
Cooking Tips & Techniques
Getting these biscuits just right can seem tricky, but a few kitchen tricks make a big difference.
- Keep butter cold: Cold butter is your best friend for flaky biscuits. If it starts to melt before baking, the texture suffers.
- Don’t overmix: Stir the dough just until it comes together. Overworking develops gluten, making biscuits tough instead of tender.
- Use fresh baking powder and soda: Old leavening agents can result in flat biscuits. A quick freshness test is to drop a pinch in warm water—if it fizzes, it’s good.
- Shape with care: Press your biscuit cutter straight down without twisting. Twisting seals the edges and hinders the rise.
- Bake hot and fast: The 425°F (220°C) oven blast helps create a crispy crust and tender inside.
- Brush immediately: Brush the garlic butter as soon as the biscuits come out so the heat melts it into the crust.
One time, I tried making these without the garlic butter glaze and it was just… missing something. Lesson learned: that final brush seals the deal. Also, multitasking by prepping the topping while the biscuits bake saves time and keeps your workflow smooth.
Variations & Adaptations
These biscuits are versatile and can be tweaked to suit different tastes and dietary needs.
- Spicy Kick: Add ½ teaspoon cayenne pepper or chopped jalapeños to the dough for a little heat that pairs surprisingly well with the cheddar.
- Herb Twist: Swap parsley for fresh rosemary or thyme in the garlic butter for a fragrant, earthy note.
- Gluten-Free Option: Use a gluten-free all-purpose flour blend with xanthan gum. Expect a slightly different texture but still delicious.
- Dairy-Free Version: Replace butter with a vegan butter substitute and use coconut or almond milk mixed with lemon juice instead of buttermilk.
- Cheese Swap: Try smoked gouda or pepper jack instead of cheddar for a different flavor profile.
I personally tried adding a sprinkle of Parmesan on top before baking once, and it gave a nice salty crunch that was a hit at a potluck. Feel free to play around and find your own favorite combo!
Serving & Storage Suggestions
Serve these biscuits warm, fresh out of the oven, for the best experience. They’re fantastic on their own or alongside creamy soups, seafood dishes, or even fried chicken.
- Serving: Brush with extra garlic butter before serving if they’ve cooled.
- Pairings: Pair with a crisp Caesar salad or a bowl of hearty clam chowder to channel that Red Lobster vibe at home.
- Storage: Store leftovers in an airtight container at room temperature for up to 2 days or refrigerate for up to 5 days.
- Freezing: Freeze cooled biscuits individually wrapped in foil or plastic wrap for up to 2 months.
- Reheating: Warm in a 350°F (175°C) oven for 8-10 minutes or microwave wrapped in a damp paper towel for 20-30 seconds.
Flavors actually develop nicely after a day, but nothing beats that fresh-out-of-the-oven crispness. If you want to keep that texture on leftovers, the oven is your best bet over the microwave.
Nutritional Information & Benefits
Each biscuit contains approximately:
| Calories | 180-200 kcal |
|---|---|
| Fat | 12g |
| Carbohydrates | 15g |
| Protein | 5g |
The cheddar cheese provides a good dose of calcium and protein, while garlic contributes antioxidants and immune-boosting properties. Using buttermilk not only adds flavor but also helps tenderize the dough. This recipe is not gluten-free by default but can be easily adapted. It contains dairy and gluten, so keep that in mind for allergen considerations.
From a wellness perspective, these biscuits are a treat, so enjoy them alongside plenty of veggies or a balanced meal. Honestly, sometimes comfort food like this is just what the soul needs.
Conclusion
These crispy Red Lobster Cheddar Bay Biscuits are more than just a copycat recipe—they’re a simple way to bring restaurant-worthy comfort food to your kitchen. Whether you’re making a special dinner or just craving something cheesy and buttery, this recipe won’t let you down.
Feel free to tweak the herbs, cheese, or spice level to match your taste. I love how forgiving this biscuit dough is, so don’t stress if it’s your first time. Remember, the best biscuits come from a little patience, cold butter, and a generous brush of garlic butter at the end.
If you try this recipe, I’d love to hear how it turns out for you—drop a comment or share your own twist. Happy baking, and here’s to many crispy, cheesy bites ahead!
FAQs
Can I make these biscuits ahead of time?
Yes! You can prepare the dough, shape the biscuits, and refrigerate them for up to 24 hours before baking. Just bring them to room temperature before putting them in the oven.
What if I don’t have buttermilk?
No worries! Mix ¾ cup (180 ml) of milk with 1 tablespoon lemon juice or vinegar and let it sit for 5 minutes to mimic buttermilk.
How do I keep the biscuits from sticking to the cutter?
Dip the biscuit cutter in flour before each cut and press straight down without twisting to prevent sticking.
Can I freeze the biscuits after baking?
Absolutely. Once cooled, wrap them tightly and freeze for up to 2 months. Reheat in the oven for best texture.
Why aren’t my biscuits fluffy?
Common causes include overmixing the dough, using old baking powder, or not keeping the butter cold. Try to handle the dough gently and use fresh ingredients for best results.
Pin This Recipe!

Crispy Red Lobster Cheddar Bay Biscuits

A simple and easy homemade version of the iconic Red Lobster Cheddar Bay Biscuits featuring a crispy outside and fluffy, cheesy inside with a buttery garlic glaze.
- Prep Time: 10 minutes
- Cook Time: 15 minutes
- Total Time: 25 minutes
- Yield: 8 biscuits 1x
- Category: Side Dish
- Cuisine: American
Ingredients
- 2 cups (240 g) all-purpose flour
- 1 tablespoon baking powder
- ½ teaspoon baking soda
- 1 teaspoon salt
- 1 tablespoon granulated sugar
- 6 tablespoons (85 g) cold unsalted butter, cubed
- 1 cup (100 g) sharp cheddar cheese, freshly shredded
- ¾ cup (180 ml) buttermilk (or milk plus 1 tablespoon lemon juice)
- 1 teaspoon garlic powder
- 1 clove fresh garlic, finely minced
- ¼ cup (56 g) butter, melted (for brushing)
- 2 tablespoons fresh parsley, finely chopped
Instructions
- Preheat your oven to 425°F (220°C) and position a rack in the middle.
- In a large bowl, whisk together flour, baking powder, baking soda, salt, sugar, and garlic powder.
- Add cold, cubed butter to the dry mix and cut in with a pastry cutter or fork until mixture resembles coarse crumbs with pea-sized bits of butter.
- Fold in shredded cheddar cheese evenly.
- Pour in buttermilk and gently stir until just combined; dough will be sticky.
- Turn dough onto a floured surface and pat into a 1-inch thick rectangle. Fold dough over itself 2-3 times to create layers, then pat back down to 1-inch thickness.
- Use a 2.5-inch round biscuit cutter dipped in flour to cut out biscuits. Place biscuits close together on a greased baking sheet or cast iron skillet for softer sides, or spaced apart for crispier edges.
- Bake for 12-15 minutes until golden brown on top and bottom.
- While baking, melt butter and stir in minced garlic and chopped parsley.
- Brush garlic butter generously over hot biscuits as soon as they come out of the oven.
- Let biscuits rest on a cooling rack for 5 minutes before serving.
Notes
Keep butter cold for flaky layers. Do not overmix dough to avoid tough biscuits. Press biscuit cutter straight down without twisting to keep edges sharp. Brush garlic butter immediately after baking for best flavor and sheen. Dough can be chilled for 10-15 minutes if too sticky. Fresh baking powder and soda ensure good rise.
Nutrition
- Serving Size: 1 biscuit
- Calories: 190
- Sugar: 2
- Sodium: 400
- Fat: 12
- Saturated Fat: 7
- Carbohydrates: 15
- Fiber: 1
- Protein: 5
Keywords: Red Lobster biscuits, cheddar bay biscuits, homemade biscuits, cheesy biscuits, garlic butter biscuits, copycat recipe