Love this? Save it for later!
Share the inspiration with your friends
The PTA Halloween bake sale was in forty-eight hours and I’d completely forgotten. My daughter had reminded me that morning, but somewhere between the school drop-off chaos and a rogue coffee spill, it had evaporated from my brain. Now I was staring at a bare pantry shelf, a half-stick of butter, and a bag of powdered sugar that felt like a personal challenge from the universe. Everyone else would be bringing elaborate haunted gingerbread houses and professionally decorated witch hat cupcakes. I had a rolling pin and a vague memory of a cookie recipe my grandmother used to make. Honestly, I was this close to just buying a bag of store-bought Oreos and calling it a day.
Then my daughter piped up from the living room. “Mom, can we make black cats? They’re my favorite.” And just like that, I had a mission. I mean, the panic was still there, let me tell you, but now there was a plan. I grabbed what I had—basic sugar cookie ingredients, a few drops of black food coloring, and a bag of candy corn I’d bought for a movie night. The whole thing felt like a gamble. I was rolling dough at 9 PM, praying the cookies wouldn’t spread into weird blobs, and trying to convince myself that these would look more like “adorable” cats and less like “abstract art” cats. Maybe you’ve been there, staring at a tray of dough, wondering if you’ve made a huge mistake.
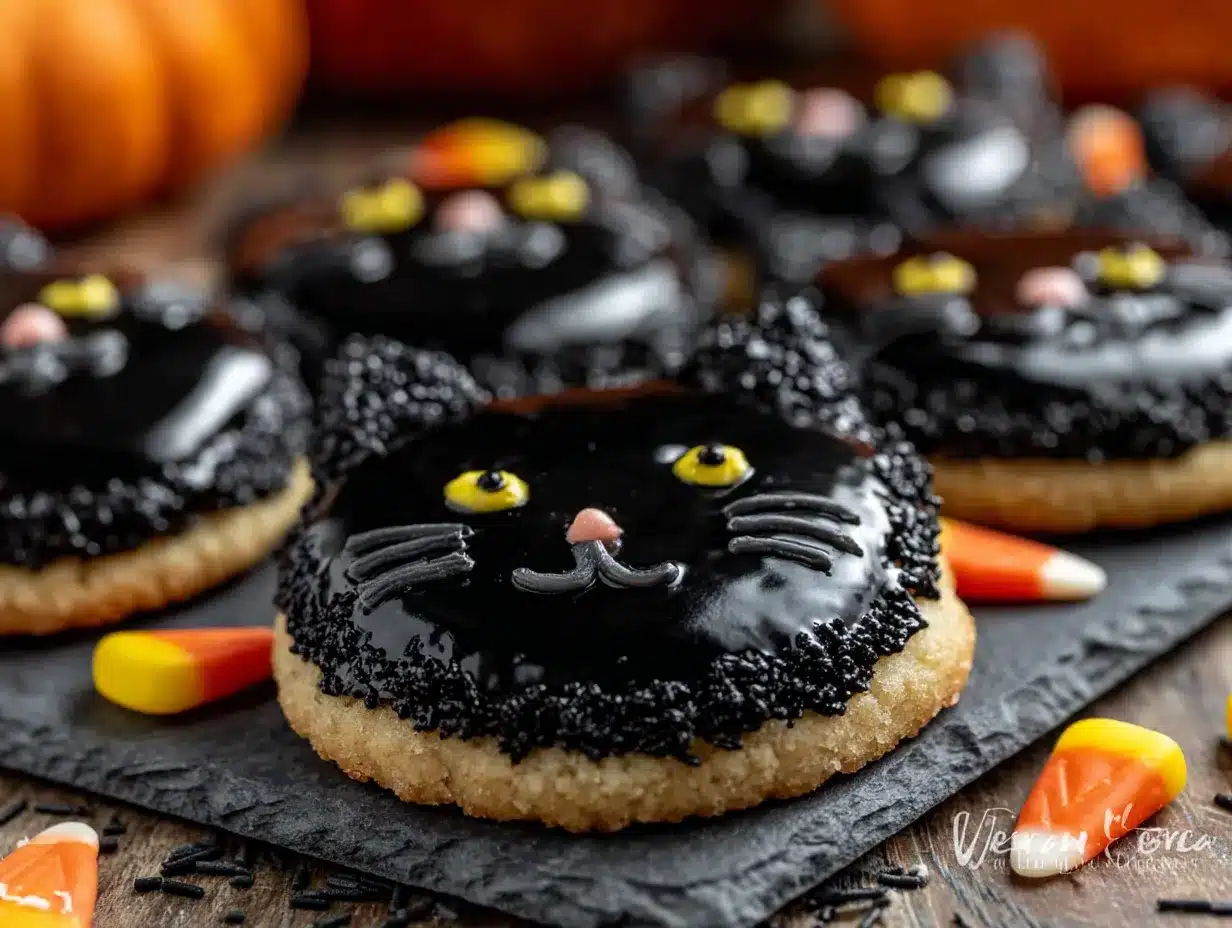
But you know what? They came out of the oven looking perfect. The black color was deep and rich, the edges were sharp, and once I stuck on those candy corn ears and a little frosting face, they were genuinely, unexpectedly cute. The bake sale was the next morning, and those cookies—my desperate, last-minute black cats—sold out in the first hour. A mom actually asked me for the recipe. That’s why I keep making them. Not because they’re fancy, but because they saved me that day, and they taste like a little victory.
Why You’ll Love This Recipe
These aren’t just any Halloween cookies. They’re the kind of cookies that make people stop and smile. I’ve tested this recipe about five times now, tweaking the flour ratio and the chill time to make sure these cats keep their shape. As a home baker who has ruined her fair share of cut-out cookies, I can tell you—this one is foolproof. It’s built on experience and a few happy accidents.
- Quick & Easy: From start to finish, you’re looking at about 45 minutes of active time. The dough comes together in one bowl, and the decorating is simple enough for kids to help with.
- Simple Ingredients: You likely have everything in your pantry right now. No weird extracts or specialty flours. Just butter, sugar, eggs, and flour.
- Perfect for Halloween: These are the star of any Halloween party, classroom treat, or spooky movie night. They’re festive without being over-the-top.
- Crowd-Pleaser: I’ve brought these to three different gatherings, and every time, the plate empties first. Kids love the cute factor, and adults love the buttery, melt-in-your-mouth texture.
- Unbelievably Delicious: The secret is a tiny splash of vanilla and a pinch of salt that balances the sweetness perfectly. They’re not just pretty—they’re genuinely good.
What makes this recipe different from the rest? It’s the trick of using a tiny bit of cocoa powder in the dough to get that deep, true black color without using a whole bottle of food coloring. It’s a little chef’s trick I picked up that makes the cookies taste like a rich, dark vanilla. This isn’t just another sugar cookie—it’s your new Halloween secret weapon. It’s the kind of recipe that makes you close your eyes after the first bite, because it’s just that good. Perfect for impressing the PTA without the stress.
What Ingredients You Will Need
This recipe uses simple, wholesome ingredients to deliver a bold, buttery flavor and a crisp-tender texture. Everything here is a pantry staple, so you can whip these up on a whim. Let’s get into what you need and why it matters.
For the Black Cat Sugar Cookies
- 1 cup (226g) unsalted butter, softened – (adds richness and tenderness) I prefer using Kerrygold for its creaminess, but any good unsalted butter works.
- 1 cup (200g) granulated sugar – (provides sweetness and structure)
- 1 large egg, room temperature – (helps bind the dough)
- 1 teaspoon vanilla extract – (adds warmth and depth) Use pure vanilla extract if you have it—it makes a difference.
- 2 ½ cups (312g) all-purpose flour – (the base of the dough) Spoon and level your flour for the best results.
- ½ cup (40g) unsweetened cocoa powder – (this is the secret to the dark color without tons of dye)
- ½ teaspoon baking powder – (helps them puff slightly without spreading)
- ¼ teaspoon salt – (balances sweetness and enhances flavor)
- Black gel food coloring – (optional, for an even deeper black) I use the Wilton brand—it’s concentrated and works perfectly.
For Decorating
- 1 cup (120g) powdered sugar – (for the royal icing)
- 1 ½ tablespoons meringue powder – (gives the icing structure) You can substitute with 1 egg white if you don’t have meringue powder.
- 2-3 tablespoons water – (to adjust consistency)
- Candy corn – (for the ears) Look for fresh, soft candy corn for the best look.
- Black sanding sugar or sprinkles – (optional, for sparkle)
- White frosting or candy eyes – (for the eyes) I use store-bought white frosting in a tube for ease.
Equipment Needed
You don’t need a fancy bakery setup for these. Here’s what you’ll want to have on hand:
- Electric mixer – A stand mixer or hand mixer works great. I use my trusty KitchenAid, but a hand mixer and a bowl will do the job just fine.
- Rolling pin – A standard rolling pin is perfect. If you don’t have one, a wine bottle works in a pinch—I’ve done it!
- Cat-shaped cookie cutter – This is key. I found a set of three different cat poses on Amazon for under $10. You can also find them at most craft stores.
- Baking sheets – At least two, so you can rotate batches. Light-colored sheets are best to prevent over-browning.
- Parchment paper – Non-stick and makes cleanup a breeze. I never bake cookies without it.
- Piping bags or small ziplock bags – For the royal icing. A tiny round tip is nice, but snipping the corner of a bag works too.
- Cooling rack – Essential for letting the cookies cool evenly before decorating.
Preparation Method
Let’s get baking. Follow these steps carefully, and you’ll have a batch of adorable black cats in no time.
- Cream the butter and sugar. In a large bowl, beat the softened butter and granulated sugar together on medium speed until light and fluffy, about 3 minutes. You want it to look pale and airy. Scrape down the sides of the bowl once. Tip: Don’t skip this step—it’s what gives the cookies their tender crumb.
- Add the wet ingredients. Beat in the egg and vanilla extract until fully combined. The mixture might look a little curdled at this point, but that’s okay. It will come together once you add the dry ingredients.
- Whisk the dry ingredients. In a separate bowl, whisk together the flour, cocoa powder, baking powder, and salt. This ensures the baking powder is evenly distributed. If you want the deepest black color, sift the cocoa powder first to remove any lumps.
- Combine wet and dry. Gradually add the dry ingredients to the wet mixture, mixing on low speed until just combined. Don’t overmix—stop as soon as you don’t see any more streaks of flour. The dough will be stiff but pliable.
- Add food coloring (optional). If you want an even darker, more dramatic black, knead in a few drops of black gel food coloring at this point. Wear gloves unless you want stained fingers for a day. I learned that the hard way.
- Chill the dough. Divide the dough in half, flatten each half into a disc, wrap tightly in plastic wrap, and refrigerate for at least 1 hour. This step is non-negotiable—chilled dough holds its shape better when cut and baked. You can chill it overnight if you’re prepping ahead.
- Preheat and prep. When you’re ready to bake, preheat your oven to 350°F (175°C). Line two baking sheets with parchment paper.
- Roll and cut. On a lightly floured surface, roll one disc of dough to about ¼-inch thickness. Use your cat cookie cutter to cut out shapes. Re-roll the scraps once—after that, the dough gets tough. Tip: Dip the cutter in flour between cuts to prevent sticking.
- Bake. Place the cookies about 1 inch apart on the prepared baking sheets. Bake for 8-10 minutes. The edges should be set but not browned. They will look slightly soft in the center—that’s perfect.
- Cool completely. Let the cookies cool on the baking sheet for 5 minutes, then transfer them to a wire rack to cool completely. Do not try to decorate them while they’re warm, or the icing will melt into a mess.
Cooking Tips & Techniques
I’ve made these cookies about a dozen times now, and I’ve picked up a few tricks along the way. Here’s what I wish I knew from the start.
Don’t overwork the dough. My first batch was tough because I kept re-rolling the scraps. Now I know to roll it no more than twice. The first roll gives you the best texture. For the second roll, the cookies will be slightly denser, but they’ll still taste great.
Chill between batches. If your dough starts feeling sticky or soft while you’re cutting shapes, pop it back in the fridge for 10 minutes. It makes a huge difference in keeping those sharp edges on the cat ears and tails.
The candy corn ear trick. I tried piping ears with frosting once. It was a disaster. Candy corn is the way to go—it looks exactly like little cat ears. Just press them gently into the dough before baking, or attach them with a dab of icing after baking. I prefer baking them on, but watch the oven—candy corn can melt if it’s in too long.
Consistency is key. If you’re making a big batch, use a kitchen scale to weigh your flour. It’s the only way to ensure every cookie comes out the same. I’ve had batches that spread too much because I scooped the flour too loosely.
My biggest failure? I once forgot the salt. The cookies were flat and tasted like sweet cardboard. That pinch of salt is doing a lot of heavy lifting—don’t skip it.
Variations & Adaptations
These cookies are a great base for creativity. Here are a few ways I’ve adapted them over the years.
- Gluten-Free Version: Swap the all-purpose flour for a 1:1 gluten-free baking blend. I use Bob’s Red Mill, and it works perfectly. Just add an extra tablespoon of flour if the dough feels too sticky.
- Vegan Option: Use vegan butter and a flax egg (1 tablespoon ground flaxseed mixed with 3 tablespoons water). The texture will be slightly more crumbly, but the taste is still spot-on.
- Spooky Spider Variation: Instead of cats, use a round cutter and add pretzel stick legs. Pipe on eight legs with black icing for a creepy-crawly look. My son loved this version.
- White Chocolate Dip: Melt some white chocolate and dip the baked cookies halfway. Sprinkle with orange sanding sugar for a “glowing” effect. It’s a little extra, but it’s gorgeous.
- Spiced Version: Add 1 teaspoon of cinnamon and ½ teaspoon of nutmeg to the dry ingredients for a warm, fall-flavored cookie. It pairs beautifully with the cocoa.
Serving & Storage Suggestions
These cookies are best served at room temperature. The royal icing should be fully set before you stack them, which takes about 2 hours. I like to arrange them on a platter with some orange and purple sprinkles scattered around for a festive look.
For serving: They pair wonderfully with a cold glass of milk, a warm cup of spiced apple cider, or even a scoop of vanilla ice cream for a dessert sundae. They’re also perfect for dipping in hot chocolate. I may have tested this theory thoroughly.
Storage: Store undecorated cookies in an airtight container at room temperature for up to 1 week. Decorated cookies can be stored in a single layer (or between sheets of wax paper) for up to 5 days. The candy corn will soften slightly over time, but they’ll still be delicious.
Freezing: You can freeze the unbaked dough discs for up to 3 months. Just thaw them in the fridge overnight before rolling and baking. Baked, undecorated cookies also freeze well for up to 2 months. Thaw at room temperature before decorating. The flavors actually develop nicely after a day in the fridge—the cocoa becomes more pronounced.
Nutritional Information & Benefits
Let’s be real—these are cookies. They’re a treat. But here’s the breakdown per cookie (based on a yield of 24 cookies):
- Calories: Approximately 180
- Fat: 9g
- Carbohydrates: 24g
- Protein: 2g
- Sugar: 12g
While they’re not health food, the cocoa powder does provide a small dose of antioxidants. Using unsalted butter gives you control over the sodium content. For a slightly lighter option, you can reduce the sugar by ¼ cup—the cookies will be less sweet but still tasty. These are not suitable for nut-free environments if you use almond flour in the gluten-free version. Always check your candy corn for gelatin if serving vegetarians.
Honestly, I think there’s a place for a little indulgence, especially during the holidays. These cookies bring joy, and that counts for something, right?
Conclusion
These adorable black cat sugar cookies are more than just a Halloween treat—they’re a little project that brings people together. Whether you’re making them for a school party, a neighborhood gathering, or just a cozy night in, they’re guaranteed to put a smile on everyone’s face. I love how forgiving this recipe is, and how the simple act of pressing on a candy corn ear can turn a plain cookie into something so full of personality.
I hope you give them a try and make them your own. Maybe you’ll add a little sparkle with some edible glitter, or maybe you’ll make a whole army of cats in different poses. Whatever you do, I’d love to hear about it. Drop a comment below and tell me how your black cats turned out—or share your own twist on the recipe. Happy Halloween, and happy baking!
Frequently Asked Questions
Can I use regular liquid food coloring instead of gel?
You can, but you’ll need a lot of it to get a true black color, which can make the dough sticky and affect the texture. Gel food coloring is much more concentrated and works better for this recipe.
How do I keep the cookies from spreading?
The key is chilling the dough for at least an hour. Also, make sure your butter is softened but not melted. If your kitchen is warm, chill the cut-out cookies on the baking sheet for 10 minutes before baking.
Can I make the dough ahead of time?
Absolutely. You can refrigerate the dough discs for up to 3 days, or freeze them for up to 3 months. Just thaw in the fridge overnight before rolling and cutting.
My candy corn ears melted in the oven. What went wrong?
Candy corn melts at a lower temperature than cookie dough bakes. Try pressing the candy corn into the cookies immediately after they come out of the oven, while they’re still warm. The residual heat will set them without melting them entirely.
Can I use a different cookie cutter shape?
Of course! This dough works great with any shape. For Halloween, you can use ghost, pumpkin, or bat cutters. Just adjust the baking time if the shapes are much larger or smaller than the cat cutter.
Pin This Recipe!

Adorable Black Cat Sugar Cookies: Easy Halloween Treats

These adorable black cat sugar cookies are the perfect Halloween treat. Made with a secret touch of cocoa for a deep black color, they’re easy to make and guaranteed to be a crowd-pleaser at any spooky gathering.
- Prep Time: 45 minutes
- Cook Time: 10 minutes
- Total Time: 1 hour 55 minutes (including 1 hour chill time)
- Yield: 24 servings 1x
- Category: Dessert
- Cuisine: American
Ingredients
- 1 cup (226g) unsalted butter, softened
- 1 cup (200g) granulated sugar
- 1 large egg, room temperature
- 1 teaspoon vanilla extract
- 2 ½ cups (312g) all-purpose flour
- ½ cup (40g) unsweetened cocoa powder
- ½ teaspoon baking powder
- ¼ teaspoon salt
- Black gel food coloring (optional)
- 1 cup (120g) powdered sugar
- 1 ½ tablespoons meringue powder
- 2–3 tablespoons water
- Candy corn (for ears)
- Black sanding sugar or sprinkles (optional)
- White frosting or candy eyes
Instructions
- Cream the butter and sugar: In a large bowl, beat the softened butter and granulated sugar together on medium speed until light and fluffy, about 3 minutes. Scrape down the sides of the bowl once.
- Add the wet ingredients: Beat in the egg and vanilla extract until fully combined.
- Whisk the dry ingredients: In a separate bowl, whisk together the flour, cocoa powder, baking powder, and salt.
- Combine wet and dry: Gradually add the dry ingredients to the wet mixture, mixing on low speed until just combined. Do not overmix.
- Add food coloring (optional): If desired, knead in a few drops of black gel food coloring until evenly distributed.
- Chill the dough: Divide the dough in half, flatten each half into a disc, wrap tightly in plastic wrap, and refrigerate for at least 1 hour.
- Preheat and prep: Preheat oven to 350°F (175°C). Line two baking sheets with parchment paper.
- Roll and cut: On a lightly floured surface, roll one disc of dough to about ¼-inch thickness. Use a cat-shaped cookie cutter to cut out shapes. Re-roll scraps only once.
- Bake: Place cookies about 1 inch apart on prepared baking sheets. Bake for 8-10 minutes, until edges are set but not browned.
- Cool completely: Let cookies cool on the baking sheet for 5 minutes, then transfer to a wire rack to cool completely before decorating.
Notes
Chill the dough for at least 1 hour to prevent spreading. For the deepest black color, sift the cocoa powder and use black gel food coloring. To attach candy corn ears, press them into the cookies immediately after baking while still warm, or attach with a dab of icing after cooling. Store undecorated cookies in an airtight container at room temperature for up to 1 week; decorated cookies for up to 5 days.
Nutrition
- Serving Size: 1 cookie
- Calories: 180
- Sugar: 12
- Fat: 9
- Carbohydrates: 24
- Protein: 2
Keywords: Halloween cookies, black cat cookies, sugar cookies, easy Halloween treats, cut-out cookies, spooky cookies


