Love this? Save it for later!
Share the inspiration with your friends
My neighbor, Mrs. Kowalski, saw me wrestling a bag of frozen cranberries through my front door last December and just shook her head. She didn’t say anything at first, just gave me that look—the one that says, “You’re making this harder than it needs to be, dear.” Then she disappeared into her house and came back with a foil-covered pan. “For your holiday table,” she said, like it was nothing. Inside were these perfect little squares of creamy cheesecake topped with a crackly layer of peppermint bark. I took one bite, and honestly, I almost dropped the pan. The crust had this buttery snap, the filling was so smooth it felt like a secret, and that peppermint crunch on top was just pure joy. I asked her for the recipe on the spot, and she laughed—said it was her granddaughter’s favorite thing to make together. I’ve tweaked it a bit over the year, swapping in a few shortcuts for busy weeknights, but the heart of it is still hers. Maybe you’ve been there—staring down a holiday dessert list that’s way too long and wondering how you’ll pull it off without losing your mind. These peppermint bark cheesecake bars are my answer to that chaos. They look fancy enough for a party but come together with ingredients you can grab at any grocery store. I keep making them because they solve a real problem: how to get something impressive on the table without spending all day in the kitchen. Plus, they make the whole house smell like a candy cane dream.
Why You’ll Love This Recipe
I’ve tested this recipe more times than I care to admit—through sticky fingers, a cracked springform pan, and one memorable incident involving a rogue candy cane shard flying across the kitchen. Each batch taught me something new, and I’m sharing every hard-won tip with you. These peppermint bark cheesecake bars aren’t just another holiday dessert; they’re the one that disappears first at every party.
- Quick & Easy: From start to finish, these bars take about 30 minutes of active prep time. The oven does the rest of the work while you tackle gift wrapping or herd kids away from the Christmas tree.
- Simple Ingredients: You probably have most of these in your pantry right now. No need to hunt down specialty stores or spend a fortune on exotic extracts. Cream cheese, butter, sugar, and chocolate—that’s your shopping list.
- Perfect for Holiday Gatherings: Whether it’s a cookie swap, school party, or family dinner, these bars fit right in. They slice cleanly, travel well, and don’t require last-minute assembly.
- Crowd-Pleaser: I’ve watched picky eaters and dessert snobs alike go back for seconds. Kids love the peppermint crunch, and adults appreciate the balanced sweetness.
- Unbelievably Delicious: That first bite hits you with creamy cheesecake, then gives way to crunchy chocolate and cool peppermint. It’s the kind of dessert that makes you close your eyes for a second.
What makes these bars different from every other peppermint bark cheesecake recipe out there? It’s the technique. Instead of layering the bark on top after baking, I press crushed candy canes into the chocolate layer while it’s still warm. This creates a magical texture—the candy stays crunchy rather than melting into a sticky mess. I learned this trick after ruining three batches with soggy peppermint topping. Trust me, this method works.
These peppermint bark cheesecake bars are the kind of dessert that makes you look like a hero without the stress. They’re comfort food dressed up in holiday sparkle—faster than a full cheesecake, but with all the creamy satisfaction. Perfect for impressing your in-laws or treating yourself after a long day of decorating.
What Ingredients You Will Need
This recipe relies on simple, everyday ingredients to create something special. Most of these are pantry staples you probably already have, especially if you’ve done any holiday baking this season. The few specialty items—like candy canes and white chocolate—are easy to find at any grocery store during December.
- For the Crust:
- 2 cups chocolate cookie crumbs (about 24 Oreos, finely crushed, cream filling included)
- 5 tablespoons unsalted butter, melted
- 2 tablespoons granulated sugar
- For the Cheesecake Filling:
- 16 ounces cream cheese, softened to room temperature (I prefer Philadelphia for the smoothest texture)
- 3/4 cup granulated sugar
- 2 large eggs, room temperature
- 1 teaspoon vanilla extract
- 1/2 teaspoon peppermint extract (use pure extract, not imitation, for the best flavor)
- 1/4 cup sour cream, room temperature (adds richness and prevents cracking)
- For the Peppermint Bark Topping:
- 1 cup semi-sweet chocolate chips (I like Ghirardelli for consistent melting)
- 1/2 cup white chocolate chips
- 1/2 cup crushed candy canes or peppermint candies (about 6-8 regular candy canes)
- 1 teaspoon coconut oil or vegetable shortening (divided, for smoother melting)
Ingredient Notes and Substitutions: For the crust, you can use chocolate graham crackers or chocolate wafer cookies if you don’t have Oreos on hand. Just skip the sugar if your cookies are already sweet. For a gluten-free version, use gluten-free chocolate sandwich cookies—they work perfectly. The cream cheese must be full-fat for the creamiest texture; low-fat versions can make the filling grainy. If you’re dairy-free, use vegan cream cheese and butter substitutes, though the texture will be slightly less rich. For the peppermint extract, start with 1/2 teaspoon and taste the batter—some brands are stronger than others. You can always add more, but you can’t take it out. The candy canes can be crushed by hand in a zip-top bag with a rolling pin, or you can pulse them in a food processor for finer pieces. Just don’t pulverize them into powder—you want some texture.
Equipment Needed
You don’t need a professional bakery setup for these peppermint bark cheesecake bars. Most of these tools are standard kitchen equipment, and I’ve included workarounds for anything you might be missing.
- 9×9-inch baking pan (an 8×8 works too, but bars will be slightly taller)
- Parchment paper (for easy lifting and cleanup)
- Electric hand mixer or stand mixer (a whisk and strong arm work in a pinch)
- Large mixing bowls (at least two)
- Medium saucepan or microwave-safe bowl for melting chocolate
- Rubber spatula
- Rolling pin or food processor for crushing candy canes
- Zip-top bag (for the candy-crushing method)
- Sharp knife for clean slices
If you don’t have parchment paper, you can grease the pan thoroughly with butter and dust it with cocoa powder. Your bars might stick a little at the edges, but they’ll still taste amazing. For melting chocolate, I prefer the microwave method—30-second bursts at 50% power, stirring between each—because it gives you more control than a double boiler. Just watch it closely; chocolate burns faster than you’d think. I learned that lesson the hard way when I ruined a whole bag of white chocolate chips. The smell lingers for days.
Preparation Method
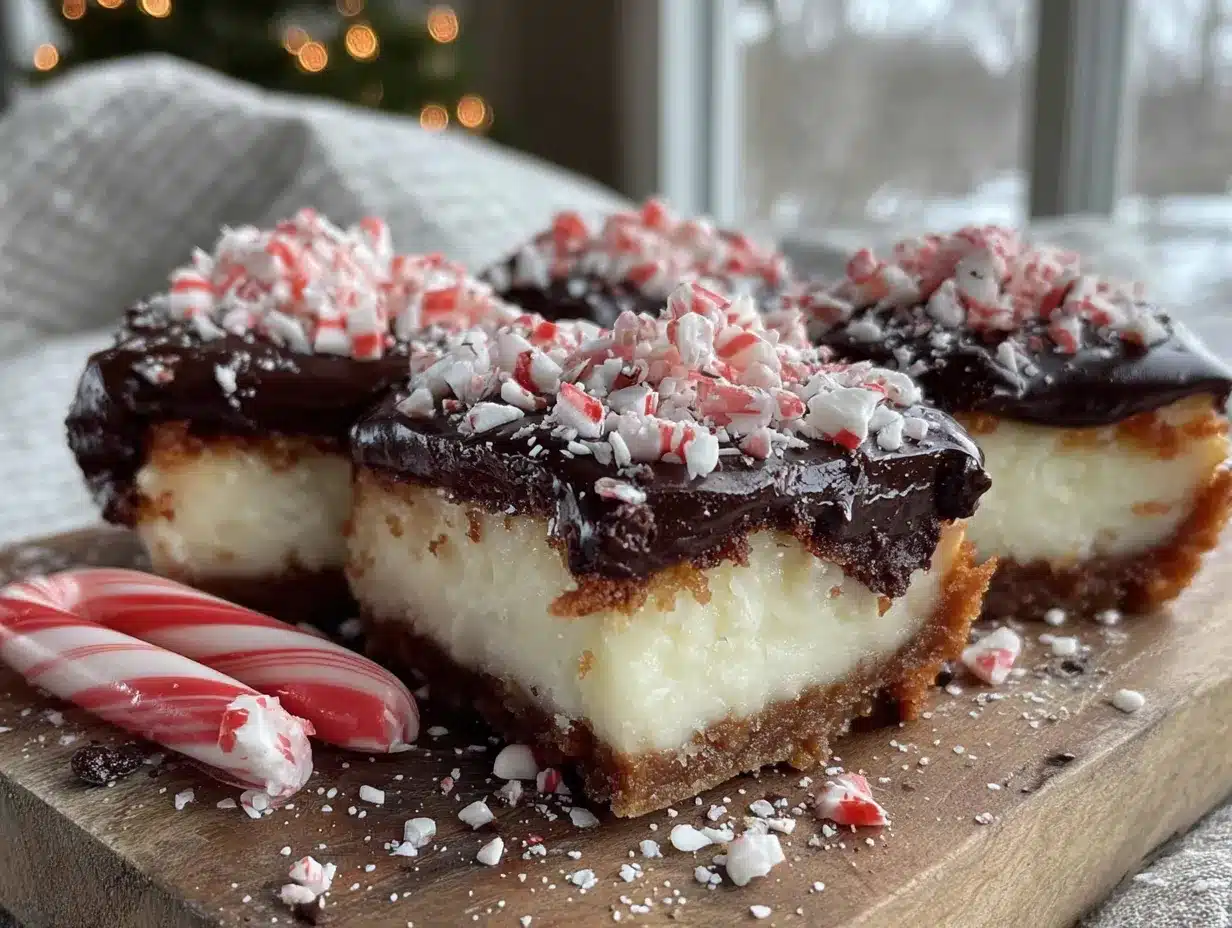
Follow these steps carefully, and you’ll have perfect peppermint bark cheesecake bars every time. I’ve included sensory cues and troubleshooting tips so you know exactly what to look for at each stage.
- Preheat and Prep: Preheat your oven to 325°F (160°C). Line your 9×9-inch baking pan with parchment paper, leaving a 2-inch overhang on two opposite sides. This creates handles for lifting the bars out later. If you skip this step, you’ll be digging them out with a spatula—trust me, I’ve been there.
- Make the Crust: In a medium bowl, combine the chocolate cookie crumbs and sugar. Pour in the melted butter and stir with a fork until the mixture looks like wet sand and holds together when pressed. Press this mixture firmly into the bottom of your prepared pan. Use the bottom of a measuring cup to get it even and compact. Bake for 10 minutes, then set aside to cool slightly. The crust should feel set but not hard.
- Prepare the Cheesecake Filling: In a large bowl, beat the softened cream cheese with an electric mixer on medium speed until smooth and creamy—about 2 minutes. Scrape down the sides and beaters. Add the sugar and beat for another minute until light and fluffy. Add the eggs one at a time, beating on low speed after each addition just until combined. Overbeating at this stage incorporates too much air, which can cause cracks. Add the vanilla extract, peppermint extract, and sour cream, then mix on low until just combined. The batter should be smooth, thick, and slightly glossy. Give it a quick taste—it should be subtly pepperminty, not overpowering.
- Bake the Cheesecake: Pour the filling over the warm crust and spread it evenly with a spatula. Gently tap the pan on the counter a few times to release any air bubbles. Bake for 35-40 minutes, or until the edges are set and the center jiggles slightly when you shake the pan. It will look puffed and pale golden around the edges. Don’t overbake—the center will continue to set as it cools. Turn off the oven, crack the door open, and let the cheesecake sit inside for 15 minutes. This gradual cooling prevents cracking.
- Cool Completely: Remove the pan from the oven and place it on a wire rack. Let it cool to room temperature for about 1 hour. Then, cover with plastic wrap and refrigerate for at least 4 hours, or overnight. Chilling is crucial—it firms up the cheesecake so you can slice it cleanly. I’ve rushed this step before, and the bars turned into a delicious but messy pudding.
- Make the Peppermint Bark Topping: Once the cheesecake is fully chilled, prepare the topping. In a microwave-safe bowl, combine the semi-sweet chocolate chips with 1/2 teaspoon of coconut oil. Microwave in 30-second bursts at 50% power, stirring between each, until smooth and melted. In a separate bowl, repeat with the white chocolate chips and remaining coconut oil. Let both cool for 2-3 minutes—if the chocolate is too hot, it will melt the cheesecake surface.
- Assemble the Bars: Pour the melted semi-sweet chocolate over the chilled cheesecake and spread it evenly with a spatula. Immediately drizzle the white chocolate on top in a zigzag pattern. Use a knife or toothpick to swirl the two chocolates together gently—don’t over-swirl, or you’ll lose the contrast. While the chocolate is still wet, sprinkle the crushed candy canes evenly over the surface. Press them in gently with your fingers so they stick. Refrigerate for 30 minutes to set the chocolate.
- Slice and Serve: Lift the bars out of the pan using the parchment paper overhang. Place on a cutting board and use a sharp knife to slice into 16 squares. For clean cuts, wipe the knife clean between slices. If the chocolate cracks, run the knife under hot water and dry it before cutting each piece. Serve cold or at room temperature.
Cooking Tips & Techniques
After making these peppermint bark cheesecake bars more times than I can count, I’ve collected a few tricks that make the process smoother and the results more reliable. Let me share what I’ve learned through trial and error—mostly error.
Room Temperature Ingredients Are Non-Negotiable: Cold cream cheese creates lumpy batter, and cold eggs can make the filling curdle. Set your cream cheese, eggs, and sour cream on the counter for at least 30 minutes before you start. If you’re in a hurry, cut the cream cheese into cubes and microwave it for 10 seconds at a time until softened. Just don’t melt it—warm cream cheese won’t whip properly.
Don’t Overmix the Filling: I know it’s tempting to keep beating until everything looks perfectly smooth, but overmixing incorporates too much air. Those air bubbles expand during baking and create cracks on the surface. Mix just until the ingredients come together, then stop. A few tiny lumps will smooth out during baking.
Water Bath Shortcut: Traditional cheesecakes require a water bath to prevent cracking, but for these bars, I skip it. The shallow pan and shorter baking time mean cracks are less likely. If you’re worried, place a shallow pan of hot water on the oven rack below the cheesecake. The steam keeps the oven moist and reduces cracking risk.
Crushing Candy Canes Without the Mess: Put your candy canes in a zip-top bag, wrap it in a kitchen towel, and smash them with a rolling pin. The towel catches any rogue shards and prevents the bag from splitting. Aim for pieces about the size of small peas—too fine, and they dissolve into the chocolate; too large, and they’re hard to bite through.
Timing Strategy: Make the crust and filling one evening, bake and chill overnight, then add the topping the next day. This breaks the work into manageable chunks and gives the flavors time to meld. The bars actually taste better on day two—the peppermint flavor deepens and the crust softens slightly.
Variations & Adaptations
One of the best things about this recipe is how easily it adapts to different tastes and dietary needs. I’ve tried several variations over the years, and each one brought something new to the table.
- Dark Chocolate Peppermint Bars: Swap the semi-sweet chocolate in the topping for dark chocolate (60-70% cacao). The bitterness balances the sweet cheesecake and white chocolate drizzle. My husband prefers this version—he says it tastes more sophisticated.
- Gluten-Free Version: Use gluten-free chocolate sandwich cookies for the crust. Most brands work well, though some are crumblier than others. Add an extra tablespoon of melted butter if the mixture seems dry. The rest of the ingredients are naturally gluten-free, so this is an easy swap.
- Mint Chocolate Chip Twist: Fold 1/2 cup of mini chocolate chips into the cheesecake filling before baking. This adds little pockets of chocolate throughout the creamy layer. It’s a fun surprise for kids and adds extra texture.
- No-Bake Version: For a quicker option, use a no-bake cheesecake filling. Beat 8 ounces of cream cheese with 1/4 cup sugar, then fold in 1 cup of whipped cream and the peppermint extract. Pour over the baked crust and chill until firm. The texture is lighter and fluffier, but still delicious.
- Seasonal Swaps: In spring, swap the peppermint extract for lemon extract and top with white chocolate and crushed freeze-dried raspberries. In fall, use pumpkin pie spice in the filling and top with caramel and toasted pecans. The basic formula works year-round.
I once tried a version with crushed gingerbread cookies for the crust instead of chocolate. It was good—spicy and warm—but it clashed with the peppermint. Stick with chocolate or vanilla wafers for the best flavor harmony.
Serving & Storage Suggestions
These peppermint bark cheesecake bars are versatile enough for any holiday occasion. Here’s how to serve and store them for the best results.
Serving Temperature: I prefer these bars cold, straight from the fridge. The cheesecake is firm and creamy, and the chocolate topping snaps when you bite into it. If you like a softer texture, let them sit at room temperature for 10-15 minutes before serving. For parties, arrange them on a platter with fresh mint leaves and a dusting of powdered sugar for a festive look.
Complementary Pairings: Serve these bars alongside a cup of hot cocoa, coffee, or peppermint tea. The creamy sweetness pairs beautifully with a tart cranberry cocktail or a glass of cold milk for the kids. For a dessert spread, arrange them next to crispy garlic chicken for a savory-sweet contrast that surprises guests.
Storage Instructions: Store the bars in an airtight container in the refrigerator for up to 5 days. Layer them between sheets of parchment paper to prevent sticking. The flavors actually improve after a day or two—the peppermint mellows and the crust softens slightly. If you’re making them for a party, prepare them 1-2 days in advance.
Freezing Tips: These bars freeze beautifully for up to 3 months. Wrap each bar individually in plastic wrap, then place them in a freezer-safe bag or container. To thaw, transfer them to the refrigerator overnight. Don’t thaw at room temperature—condensation can make the chocolate topping weep. I always keep a stash in the freezer for unexpected guests or late-night cravings.
Reheating: These bars are best served cold, but if you want a warm dessert, microwave a single bar for 10-15 seconds. The cheesecake will soften, and the chocolate will become slightly gooey. It’s a different experience—more like a molten lava cake—but equally delicious.
Nutritional Information & Benefits
Let’s be honest—these peppermint bark cheesecake bars are a treat, not a health food. But knowing what’s in them helps you enjoy them mindfully. Here’s the estimated nutritional breakdown per bar (based on 16 servings):
| Nutrient | Amount per Bar |
|---|---|
| Calories | 285 |
| Total Fat | 18g |
| Saturated Fat | 10g |
| Cholesterol | 55mg |
| Sodium | 180mg |
| Total Carbohydrates | 28g |
| Dietary Fiber | 1g |
| Sugars | 22g |
| Protein | 4g |
Health Benefits: While these bars are indulgent, they do offer a few redeeming qualities. The cream cheese provides calcium and protein, and the dark chocolate contains antioxidants. The peppermint extract can aid digestion—a nice bonus after a heavy holiday meal. For a slightly lighter version, use reduced-fat cream cheese and skip the white chocolate drizzle. The flavor will still be satisfying, just a bit less decadent.
Dietary Considerations: This recipe contains dairy, gluten, and eggs. For a dairy-free version, use vegan cream cheese, butter, and chocolate. For gluten-free, swap the crust as mentioned above. The bars are not suitable for vegan diets unless you use egg substitutes, which I haven’t tested. If you have a nut allergy, rest assured—this recipe is nut-free as written, but always check your chocolate labels for cross-contamination warnings.
Conclusion
These peppermint bark cheesecake bars have become a staple in my holiday baking rotation for good reason. They deliver all the creamy, crunchy, minty goodness of a fancy bakery dessert without the stress or the price tag. Mrs. Kowalski’s original recipe taught me that the best holiday treats don’t need complicated techniques or obscure ingredients—they just need a little love and a few smart shortcuts.
I hope you’ll try these bars and make them your own. Maybe you’ll add extra candy canes for more crunch, or swap the dark chocolate for milk chocolate to please the kids. That’s the beauty of this recipe—it’s forgiving and adaptable. I’d love to hear how yours turn out. Drop a comment below and tell me about your holiday baking adventures. Did you add a twist? Did your family fight over the last piece? Share your stories—I read every single one.
Until next time, happy baking, and may your kitchen smell like peppermint and joy.
Frequently Asked Questions
Can I use pre-crushed candy canes from a store?
Yes, you can buy pre-crushed candy canes or peppermint crunch in the baking aisle. They save time and are already evenly crushed. Just check the package to make sure there are no added ingredients like artificial colors that might bleed into the chocolate.
Why did my cheesecake crack on top?
Cracks usually happen from overbaking or sudden temperature changes. Make sure you don’t overmix the batter, bake just until the edges are set and the center jiggles, and cool the cheesecake slowly in the oven with the door cracked. The chocolate topping will hide any small cracks anyway.
Can I make these bars without a mixer?
Absolutely. You can beat the cream cheese and sugar by hand with a wooden spoon, but it will take some elbow grease. Make sure the cream cheese is very soft—almost room temperature—to make mixing easier. The crust and topping don’t require any electric tools at all.
How do I get clean slices without the chocolate cracking?
Use a sharp knife and run it under hot water before each cut. Dry the blade immediately, then slice. The heat helps the knife glide through the chocolate without shattering it. Wipe the blade clean between each cut for the neatest results.
Can I double this recipe for a larger crowd?
Yes, you can double the ingredients and bake in a 9×13-inch pan. Increase the baking time by about 10-15 minutes, and check for doneness using the same jiggle test. You’ll get about 24 bars instead of 16. Just make sure your pan has high enough sides to hold the extra filling.
Pin This Recipe!
Best Peppermint Bark Cheesecake Bars: Easy Holiday Dessert

These peppermint bark cheesecake bars are the perfect holiday dessert—creamy cheesecake on a chocolate cookie crust, topped with a crackly layer of peppermint bark. They look fancy enough for a party but come together with simple ingredients and minimal effort.
- Prep Time: 30 minutes
- Cook Time: 40 minutes
- Total Time: 5 hours 10 minutes (includes chilling)
- Yield: 16 servings 1x
- Category: Dessert
- Cuisine: American
Ingredients
- 2 cups chocolate cookie crumbs (about 24 Oreos, finely crushed, cream filling included)
- 5 tablespoons unsalted butter, melted
- 2 tablespoons granulated sugar
- 16 ounces cream cheese, softened to room temperature
- 3/4 cup granulated sugar
- 2 large eggs, room temperature
- 1 teaspoon vanilla extract
- 1/2 teaspoon peppermint extract
- 1/4 cup sour cream, room temperature
- 1 cup semi-sweet chocolate chips
- 1/2 cup white chocolate chips
- 1/2 cup crushed candy canes or peppermint candies (about 6–8 regular candy canes)
- 1 teaspoon coconut oil or vegetable shortening, divided
Instructions
- Preheat oven to 325°F (160°C). Line a 9×9-inch baking pan with parchment paper, leaving a 2-inch overhang on two opposite sides.
- In a medium bowl, combine chocolate cookie crumbs and sugar. Pour in melted butter and stir until mixture resembles wet sand. Press firmly into the bottom of the prepared pan. Bake for 10 minutes, then set aside to cool slightly.
- In a large bowl, beat softened cream cheese with an electric mixer on medium speed until smooth, about 2 minutes. Add sugar and beat for another minute. Add eggs one at a time, beating on low after each addition. Add vanilla extract, peppermint extract, and sour cream; mix on low until just combined.
- Pour filling over warm crust and spread evenly. Tap pan on counter to release air bubbles. Bake for 35-40 minutes, until edges are set and center jiggles slightly. Turn off oven, crack door open, and let cheesecake sit inside for 15 minutes.
- Remove pan from oven and cool on a wire rack to room temperature, about 1 hour. Cover with plastic wrap and refrigerate for at least 4 hours or overnight.
- For the topping: In a microwave-safe bowl, combine semi-sweet chocolate chips with 1/2 teaspoon coconut oil. Microwave in 30-second bursts at 50% power, stirring between, until smooth. Repeat with white chocolate chips and remaining coconut oil. Let cool for 2-3 minutes.
- Pour melted semi-sweet chocolate over chilled cheesecake and spread evenly. Drizzle white chocolate on top in a zigzag pattern. Swirl gently with a knife or toothpick. Sprinkle crushed candy canes evenly over the surface and press in gently. Refrigerate for 30 minutes to set.
- Lift bars out of pan using parchment overhang. Place on cutting board and slice into 16 squares with a sharp knife, wiping blade clean between cuts.
Notes
Room temperature ingredients are crucial for a smooth filling. Don’t overmix the batter to avoid cracks. For clean slices, run the knife under hot water and dry before each cut. The bars can be frozen for up to 3 months.
Nutrition
- Serving Size: 1 bar
- Calories: 285
- Sugar: 22
- Sodium: 180
- Fat: 18
- Saturated Fat: 10
- Carbohydrates: 28
- Fiber: 1
- Protein: 4
Keywords: peppermint bark cheesecake bars, holiday dessert, easy cheesecake bars, peppermint dessert, Christmas dessert


