Love this? Save it for later!
Share the inspiration with your friends
Introduction
“You really think chicken breast can be juicy and tender without turning into a rubbery hockey puck?” my friend Mark asked, raising an eyebrow as I fumbled with the grill on a bright Saturday afternoon. Honestly, I had no idea either. I was a total beginner at grilling, armed only with a vague recipe scribbled on the back of a takeout menu and a stubborn hope that this chicken wouldn’t end up as dry as the Sahara.
It all started that morning when I impulsively decided to host a small backyard barbecue. The power went out briefly in the middle of prepping, and I nearly gave up. But something about that sudden interruption pushed me to figure out the *real* secrets behind grilled chicken breast—juicy, tender, and flavorful, just like the pros make it look. Maybe you’ve been there too, trying to get a simple dish right but feeling like you’re one step away from kitchen chaos.
I remember the first time I bit into that grilled chicken—it wasn’t perfect, but the tenderness surprised me so much I almost forgot the messy marinade I spilled all over the counter (yeah, rookie move). This recipe stuck with me because it’s forgiving, straightforward, and tailored for beginners who want to gain confidence without endless trial and error. Let me tell you, once I nailed this, I was hooked—and now, I’m excited to share the easy steps that will make your grilled chicken breast the star of any meal.
Why You’ll Love This Recipe
After testing this grilled chicken breast method multiple times, I can say it’s truly beginner-friendly and delivers consistent results. Here’s why it’s worth making your go-to recipe:
- Quick & Easy: Ready in about 30 minutes, perfect for busy weeknights or last-minute gatherings.
- Simple Ingredients: No need for exotic spices or fancy marinades—just pantry staples you likely already have.
- Perfect for Outdoor & Indoor Cooking: Whether you’re firing up the grill or using a stovetop grill pan, this recipe adapts well.
- Crowd-Pleaser: The juicy, tender texture gets compliments from even the toughest critics (including my friend Mark!).
- Unbelievably Delicious: The seasoning is balanced just right—enough flavor without overpowering the natural chicken taste.
This isn’t just any grilled chicken breast recipe—honestly, it’s a method built on a simple brine step that locks in moisture and a precise cooking time that avoids overcooking. The secret lies in patience and a gentle touch, something I learned the hard way but now swear by. If you want that perfect juicy bite without fuss or fancy gadgets, this is exactly your recipe. And trust me, it feels great to finally serve chicken that looks and tastes like you belong in the backyard chef hall of fame.
What Ingredients You Will Need
This recipe uses simple, wholesome ingredients to deliver bold flavor and satisfying texture without any fuss. Most of these are pantry staples, so no need to make a special grocery run.
- Chicken breasts: 2 boneless, skinless (about 6-8 oz / 170-225 g each). Look for even thickness to ensure even cooking.
- Salt: 1 tablespoon kosher salt (for brining, helps retain moisture).
- Sugar: 1 teaspoon granulated sugar (balances salt and enhances browning).
- Water: 4 cups cold water (for the brine).
- Olive oil: 2 tablespoons (extra virgin preferred for flavor).
- Garlic powder: 1 teaspoon (adds mild savory depth).
- Smoked paprika: 1 teaspoon (for subtle smoky sweetness).
- Black pepper: ½ teaspoon freshly ground (for a gentle kick).
- Lemon juice: 1 tablespoon fresh (brightens the flavor).
- Fresh herbs (optional): 1 teaspoon chopped thyme or rosemary (adds fresh aroma).
If you want to keep things dairy-free and gluten-free, this recipe is already good to go. For a low-sodium option, reduce the salt in the brine but keep it enough to maintain juiciness. I recommend Diamond Crystal kosher salt if you can find it—it dissolves nicely and seasons evenly. If fresh lemon isn’t at hand, a splash of white vinegar can help tenderize too. In summer, swapping lemon for lime gives a fun twist, especially if you’re pairing this grilled chicken with a fresh salsa or salad.
Equipment Needed
Here’s what you’ll want on hand to make this grilled chicken breast recipe come out perfectly:
- Grill or grill pan: A charcoal or gas grill works great, but a stovetop grill pan is a solid alternative when outdoor grilling isn’t an option.
- Mixing bowl or large container: For the brine. Make sure it’s big enough to hold the chicken submerged in water.
- Tongs: Essential for flipping the chicken without piercing it and losing juices.
- Instant-read thermometer: Optional but highly recommended to check doneness (aim for 165°F / 74°C internal temperature).
- Measuring spoons and cups: For accurate seasoning and brine proportions.
- Plate and foil: To rest the chicken after grilling, which helps juices redistribute.
If you don’t own a grill, don’t worry! A heavy skillet or cast-iron pan with a grill rack insert can work in a pinch. When using a grill pan, lightly oil the surface to prevent sticking, and preheat it well to get those classic grill marks. I once tried grilling chicken with cheap tongs that bent under pressure—definitely worth investing in a sturdy pair for better control and less mess. For maintenance, keep your grill grate clean by brushing it after each use to avoid flare-ups and sticking.
Preparation Method
- Prepare the brine: In a large bowl, dissolve 1 tablespoon kosher salt and 1 teaspoon sugar in 4 cups cold water. Stir until fully dissolved. This step takes about 5 minutes.
- Brine the chicken: Submerge the chicken breasts in the brine, cover, and refrigerate for 30 minutes to 1 hour. This keeps the chicken juicy by allowing it to absorb moisture and seasoning.
- Preheat your grill or grill pan: Get it hot—medium-high heat (around 400°F / 200°C). Preheating takes roughly 10 minutes. You want a clean, hot surface for a good sear.
- Remove chicken and pat dry: After brining, take the chicken out and pat it dry thoroughly with paper towels. Drying is key to getting a nice crust.
- Season the chicken: Drizzle olive oil over both sides, then sprinkle garlic powder, smoked paprika, black pepper, and fresh herbs if using. Finish with a squeeze of lemon juice. This should take 2-3 minutes.
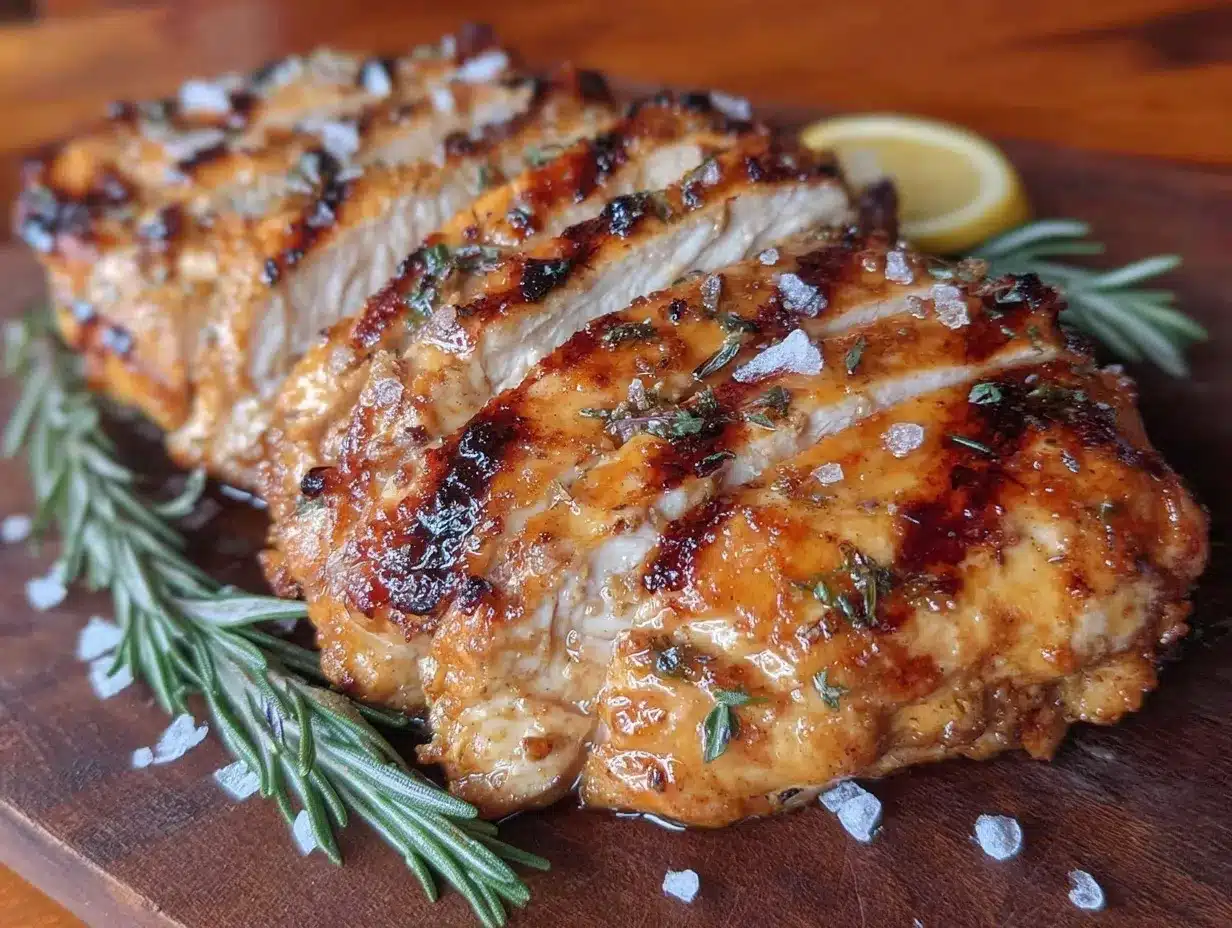
- Grill the chicken: Place the breasts on the grill and cook for 6-7 minutes per side without moving them too much. Resist the urge to poke or press down—the chicken should release easily when it’s ready to flip.
- Check for doneness: Use an instant-read thermometer inserted into the thickest part of the breast. When it hits 165°F (74°C), it’s done. If you don’t have a thermometer, cut into the thickest part to confirm juices run clear, not pink.
- Rest the chicken: Transfer to a plate and tent loosely with foil for 5 minutes. Resting lets the juices redistribute, so every bite stays juicy.
- Slice and serve: Cut against the grain for tenderness. Serve immediately or use in your favorite recipes.
Pro tip: If your chicken is unevenly thick, gently pound it with a meat mallet or rolling pin to an even thickness before brining. This helps cook the chicken uniformly and avoid dry spots. One time, I forgot the resting step and ended up with a dry edge—lesson learned!
Cooking Tips & Techniques
Getting grilled chicken breast tender and juicy takes a few nuanced tricks. Here’s what I’ve learned from both successes and flops:
- Brining is non-negotiable: Seriously, this simple soak is a game-changer. It adds moisture and seasons the meat throughout, not just on the surface.
- Don’t skip drying: Wet chicken won’t sear properly and will steam instead, leading to rubbery texture.
- Use medium-high heat: Too hot, and the outside burns before the inside cooks; too low, and you won’t get that tasty crust.
- Resist flipping frequently: One flip per side is ideal. Constant flipping stops the Maillard reaction—the browning that adds flavor.
- Invest in a thermometer: Nothing replaces the confidence of knowing exactly when your chicken is perfectly done.
- Let the chicken rest: This is where magic happens. Cutting too soon lets all the juices escape.
I once tried marinating overnight instead of brining and ended up with a salty, mushy mess—lesson learned there too! Timing is everything with grilled chicken breast, and multitasking while grilling (like prepping sides) keeps your workflow smooth. Remember, patience beats rushing every time.
Variations & Adaptations
This grilled chicken breast recipe is easy to tweak for different tastes and dietary needs. Here are a few ideas:
- Herb & Citrus Twist: Add chopped fresh basil and orange zest to the seasoning for a bright, fragrant flavor.
- Spicy Kick: Mix in ½ teaspoon cayenne pepper or hot smoked paprika for some heat without overpowering the chicken.
- Gluten-Free & Paleo: Keep the same recipe as is—no gluten-containing ingredients here. Use coconut aminos instead of soy sauce if adding a glaze.
- Oven Method: After seasoning, sear chicken breasts in a hot skillet for 2 minutes per side, then transfer to a 400°F (200°C) oven for 10-12 minutes to finish cooking.
- Personal Favorite: I like to add a teaspoon of Dijon mustard to the olive oil mixture for a subtle tang that plays nicely with smoky paprika.
For dairy-free or vegan adaptations, try grilling thick tofu or seitan using a similar brine and spice blend. This recipe’s principles of moisture retention and balanced seasoning still apply.
Serving & Storage Suggestions
Serve this grilled chicken breast warm for the best juicy texture. It pairs beautifully with fresh salads, grilled vegetables, or a simple pilaf. A squeeze of fresh lemon on top right before serving gives a nice bright finish.
Leftovers keep well in an airtight container in the fridge for 3-4 days. To reheat, warm gently in a skillet over low heat or microwave briefly, covering with a damp paper towel to maintain moisture. Avoid reheating too long or on high heat or it’ll dry out.
For freezing, slice the chicken first, wrap tightly, and freeze for up to 2 months. Thaw overnight in the fridge and reheat as above.
Fun note: flavors meld beautifully if you slice leftover chicken into salads or wraps the next day, making it even tastier after some rest.
Nutritional Information & Benefits
A serving of this grilled chicken breast (about 6 oz / 170 g) provides roughly:
| Calories | 280 |
|---|---|
| Protein | 52g |
| Fat | 6g |
| Carbohydrates | 1g |
Chicken breast is a lean source of high-quality protein, essential for muscle repair and overall health. The olive oil adds heart-healthy fats, while the lemon juice provides a dose of vitamin C. This recipe is naturally gluten-free and low in carbs, fitting nicely into many dietary plans.
Personally, I appreciate that this grilled chicken gives me a satisfying, wholesome meal without the heaviness or extra calories often found in creamy or fried dishes. It’s a simple way to eat clean while still feeling full and happy.
Conclusion
This tender grilled chicken breast recipe is a beginner’s best friend for a reason—simple steps, straightforward ingredients, and reliable results that make you feel like a backyard grilling pro. I love how adaptable it is, whether you’re cooking for a quick solo dinner or a casual weekend party.
Honestly, it’s the kind of recipe you come back to when you want comfort food without the fuss, and when you’re ready to impress without stress. I’d love to hear how you make it your own—maybe you add a favorite spice or pair it with a unique side. Feel free to leave a comment below sharing your twists or questions!
Go on, fire up your grill and enjoy that juicy, tender chicken breast—because cooking should be fun, rewarding, and delicious every time.
FAQs
How do I keep chicken breast from drying out on the grill?
Brining the chicken before grilling and not overcooking are key. Also, let the chicken rest after grilling so juices redistribute.
Can I use frozen chicken breasts for this recipe?
Yes, but make sure to thaw completely before brining and grilling to ensure even cooking.
What if I don’t have a grill—can I cook this chicken indoors?
Absolutely! Use a grill pan or sear in a skillet and finish in the oven for similar results.
How long should I marinate the chicken?
This recipe uses a quick brine of 30 minutes to 1 hour for best juiciness. Longer soaking can make the texture mushy.
Is this recipe suitable for meal prep?
Yes, grilled chicken breast keeps well in the fridge and can be sliced for salads, wraps, or reheated meals during the week.
Pin This Recipe!
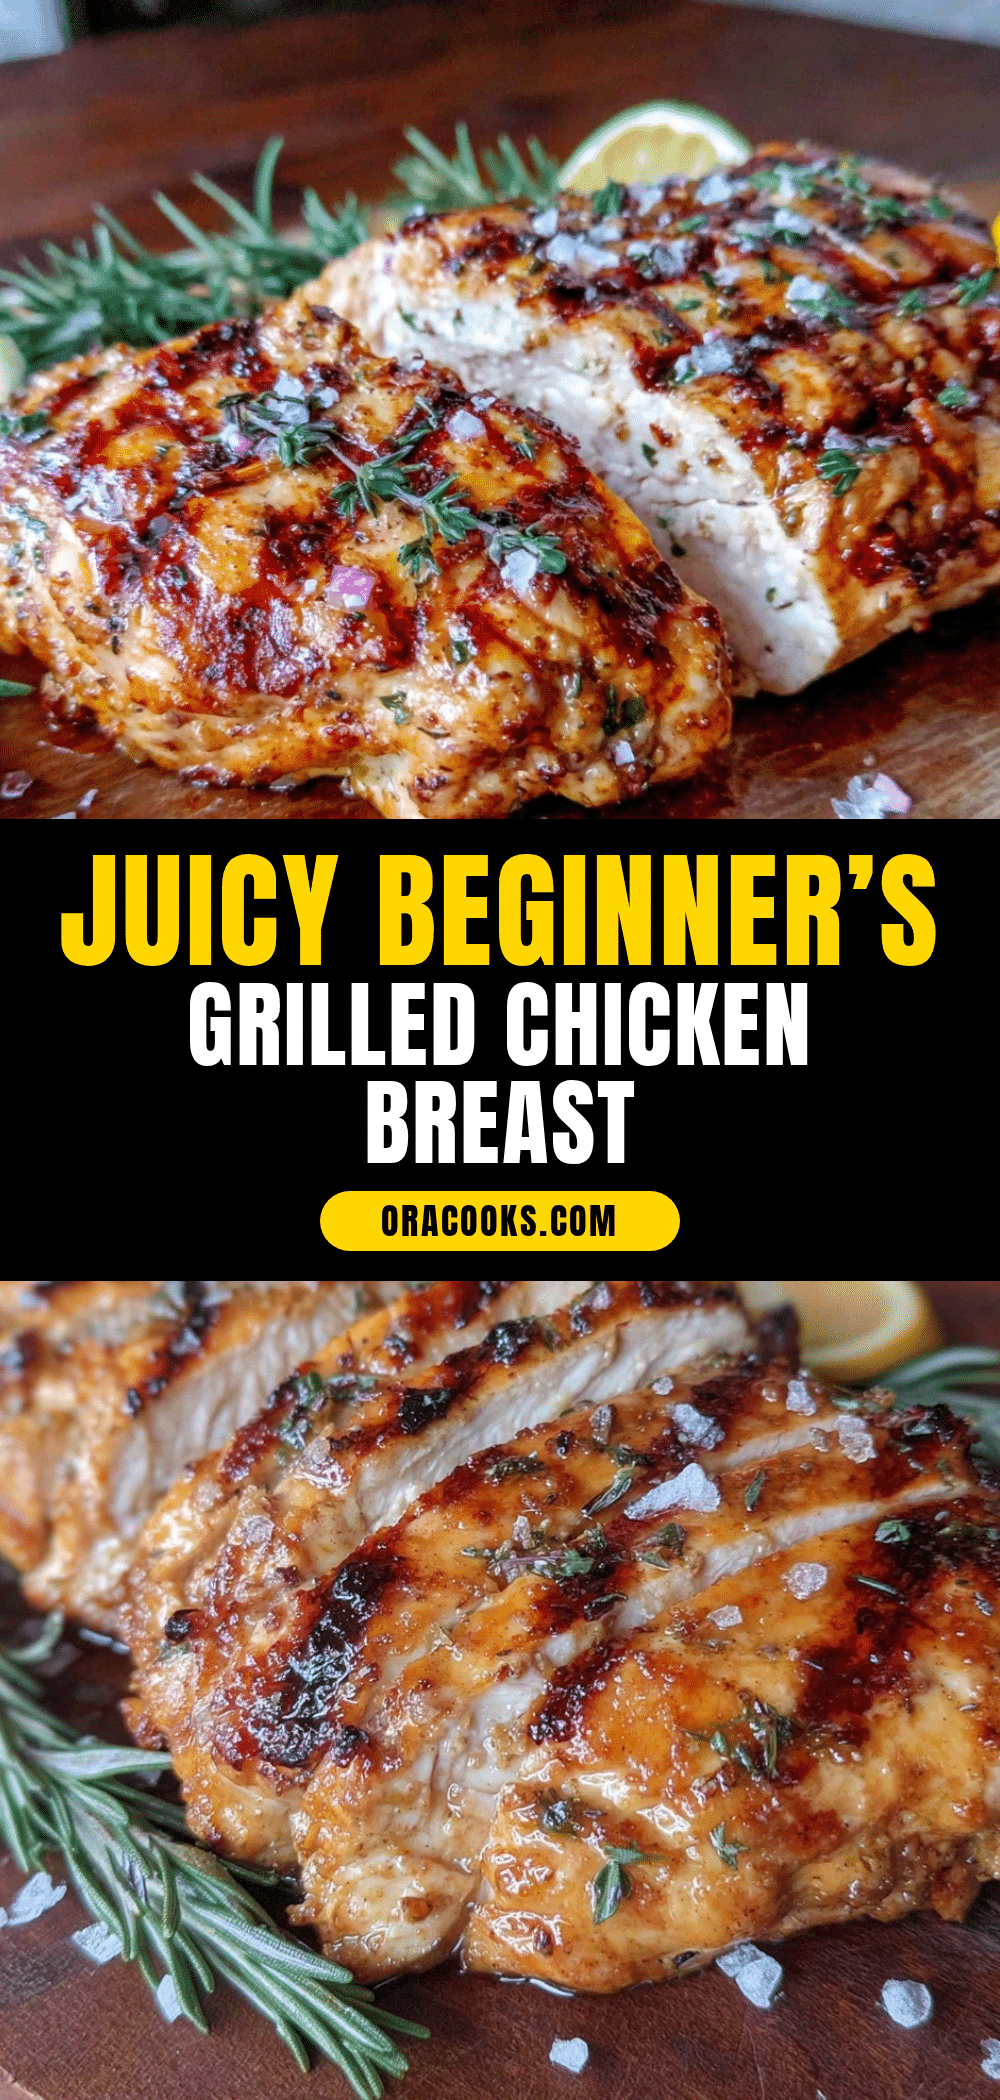
Tender Grilled Chicken Breast Recipe Easy Juicy Beginner’s Guide

A beginner-friendly grilled chicken breast recipe that delivers juicy, tender, and flavorful results using a simple brine and straightforward seasoning.
- Prep Time: 10 minutes
- Cook Time: 15 minutes
- Total Time: 40-45 minutes
- Yield: 2 servings 1x
- Category: Main Course
- Cuisine: American
Ingredients
- 2 boneless, skinless chicken breasts (about 6–8 oz / 170–225 g each)
- 1 tablespoon kosher salt
- 1 teaspoon granulated sugar
- 4 cups cold water
- 2 tablespoons olive oil (extra virgin preferred)
- 1 teaspoon garlic powder
- 1 teaspoon smoked paprika
- ½ teaspoon freshly ground black pepper
- 1 tablespoon fresh lemon juice
- 1 teaspoon chopped fresh thyme or rosemary (optional)
Instructions
- Prepare the brine: In a large bowl, dissolve 1 tablespoon kosher salt and 1 teaspoon sugar in 4 cups cold water. Stir until fully dissolved (about 5 minutes).
- Brine the chicken: Submerge the chicken breasts in the brine, cover, and refrigerate for 30 minutes to 1 hour.
- Preheat your grill or grill pan to medium-high heat (around 400°F / 200°C), about 10 minutes.
- Remove chicken from brine and pat dry thoroughly with paper towels.
- Season the chicken: Drizzle olive oil over both sides, then sprinkle garlic powder, smoked paprika, black pepper, and fresh herbs if using. Finish with a squeeze of lemon juice.
- Grill the chicken: Place the breasts on the grill and cook for 6-7 minutes per side without moving them too much.
- Check for doneness using an instant-read thermometer; chicken is done at 165°F (74°C). If no thermometer, cut into the thickest part to ensure juices run clear.
- Rest the chicken: Transfer to a plate and tent loosely with foil for 5 minutes.
- Slice against the grain and serve immediately.
Notes
Brining is essential for juiciness. Pat chicken dry before grilling to get a good sear. Use medium-high heat and avoid flipping frequently. Let chicken rest after grilling to redistribute juices. For uneven thickness, pound chicken to even thickness before brining.
Nutrition
- Serving Size: 1 chicken breast (ab
- Calories: 280
- Fat: 6
- Carbohydrates: 1
- Protein: 52
Keywords: grilled chicken breast, juicy chicken, beginner grilling recipe, easy chicken recipe, healthy chicken, backyard barbecue