Love this? Save it for later!
Share the inspiration with your friends
I was standing in the frozen food aisle of my local grocery store last Tuesday when the smell hit me—not from the store, but from somewhere deep in my memory. It was that sharp, savory scent of garlic hitting hot butter, the kind that makes your stomach growl before your brain even registers what’s happening. And suddenly I was eight years old, standing on a step stool in my neighbor Mrs. Kowalski’s kitchen, watching her sear chicken thighs in a cast iron pan that looked like it had survived a world war.
Mrs. Kowalski wasn’t my grandmother. She was just this tiny Polish woman who lived three houses down and apparently decided that I, a scrawny kid with dirt on my knees, needed to learn how to cook something that wasn’t from a box. She’d let me stand there for hours, barely saying a word, just occasionally pointing at the pan or handing me a spoon. The thing I remember most—the thing that came rushing back in that grocery aisle—was the way she’d tilt the pan toward me so I could see the butter bubbling up around the chicken, golden and fragrant and impossibly good.
I haven’t seen Mrs. Kowalski in over twenty years. She moved to Florida, I think, or maybe she passed—I never got the full story. But that smell in the frozen food aisle? It stopped me cold. I abandoned my cart right there, walked to the meat section, grabbed a pack of bone-in chicken thighs, and went home to figure out how to make that feeling again. Honestly, the first few attempts were rough. Too much garlic, not enough butter, the skin came out soggy. But after maybe six or seven tries, I landed on something that made me close my eyes on the first bite. This cozy one-pan garlic butter chicken thighs recipe is that attempt, perfected.
Maybe you’ve been there—chasing a taste from your past that you can’t quite pin down. This is that dish for me. One pan, a whole lot of butter, and the kind of garlic that hangs around in the best way possible.
Why You’ll Love This Recipe
Let me tell you why this one-pan garlic butter chicken thighs recipe has become my go-to for those evenings when I need something that feels like a hug on a plate. I’ve tested this thing more times than I care to admit, and every single time, it delivers.
- Quick & Easy: From fridge to table in about 35 minutes. No marinating overnight, no complicated techniques. Just sear, bake, and eat.
- Simple Ingredients: You probably have garlic and butter in your kitchen right now. The rest is just chicken, some herbs, and a lemon. Nothing fancy required.
- Perfect for Cozy Nights: This is the recipe for cold Tuesday evenings, rainy Sundays, or any day that ended with you wanting to crawl under a blanket and forget about adulting.
- Crowd-Pleaser: I’ve served this to picky kids, skeptical in-laws, and friends who “don’t really like dark meat.” The pan comes back empty every time.
- Unbelievably Delicious: The skin gets this crackly, golden crust while the meat underneath stays so tender it practically falls off the bone. And the garlic butter sauce? You’ll want to drink it.
What makes this different from every other chicken thigh recipe out there is the technique. Most recipes either sear the chicken and call it done or drown it in sauce and lose the crispy skin. This one balances both worlds—you get that perfect sear on the stovetop, then finish it in the oven with a garlic butter bath that keeps everything moist without sacrificing texture. It’s not just another version. It’s the version I make when I need comfort food that actually works.
Ingredients Needed
This recipe uses simple, honest ingredients that come together to create something way bigger than the sum of their parts. Most of these are pantry staples, which is exactly what you want on a night when cooking feels like a chore.
For the Chicken
- 6 bone-in, skin-on chicken thighs (about 2.5 pounds total)—bone-in gives you more flavor and keeps the meat juicy. Skin-on is non-negotiable for that crispy top.
- 1 teaspoon kosher salt—I use Diamond Crystal. If you’re using table salt, cut it back to about ¾ teaspoon.
- ½ teaspoon black pepper, freshly ground
- 1 teaspoon garlic powder—yes, fresh garlic comes later. This is for the dry rub.
- 1 teaspoon smoked paprika—adds color and a subtle smokiness that works beautifully with the butter.
For the Garlic Butter Sauce
- 4 tablespoons unsalted butter—salted butter works too, just adjust your salt accordingly. I recommend Kerrygold for the richness.
- 8 cloves garlic, minced—this sounds like a lot. It’s not. Trust me on this. Use fresh garlic, not the jarred stuff.
- 1 tablespoon olive oil—helps prevent the butter from burning during the sear.
- ½ cup chicken broth—low sodium preferred. Homemade is great, but boxed works fine here.
- 1 tablespoon fresh lemon juice—about half a lemon. This brightens everything up.
- 1 teaspoon dried thyme—or 2 teaspoons fresh thyme leaves if you have them.
- ½ teaspoon red pepper flakes—optional, but I love the tiny kick.
- 2 tablespoons fresh parsley, chopped—for garnish, but also for that fresh pop of color.
Look for chicken thighs that have even coloring and feel firm to the touch. If the skin looks blotchy or feels slimy, skip that package. For the garlic, choose firm bulbs without any green sprouts in the center—those older cloves can taste bitter when cooked.
If you’re dairy-sensitive, you can swap the butter for a high-quality vegan butter stick. Just avoid the spreadable tub versions—they have too much water content and won’t sear properly.
Equipment Needed
You don’t need a fancy kitchen to pull this off. Here’s what I use every time:
- 12-inch oven-safe skillet—cast iron is ideal, but a stainless steel or enameled pan works. If your skillet handle isn’t oven-safe, wrap it in foil.
- Tongs—for flipping the chicken without piercing the skin. A spatula works in a pinch, but tongs give you better control.
- Garlic press or microplane—I used to chop garlic by hand until I realized a press gives you finer, more consistent pieces that melt into the butter better.
- Instant-read thermometer—this is your best friend for perfectly cooked chicken. I’ve used the same Thermapen for years and it’s never let me down.
- Cutting board and sharp knife—for the parsley and lemon.
- Small bowl—for mixing the dry rub.
If you don’t have an oven-safe skillet, you can transfer the seared chicken to a baking dish before adding the garlic butter sauce. Just scrape all those browned bits from the pan into the dish—that’s pure flavor right there.
Cast iron can be pricey, but Lodge makes solid pans for around thirty bucks. I found mine at a thrift store for eight dollars and spent an afternoon reseasoning it. Best kitchen investment I ever made.
Preparation Method
Alright, let’s get cooking. This method breaks down into three simple phases: prep the chicken, sear it, and finish it in the oven. Here’s exactly how I do it.
- Preheat your oven to 400°F. Get this going first so it’s ready when you need it. Position the rack in the middle.
- Pat the chicken thighs dry with paper towels. This is the most important step for crispy skin. If the chicken is wet, it’ll steam instead of sear. I usually pat each thigh, flip it, and pat again. Let them sit on the counter for about 10 minutes after patting to air-dry slightly.
- Mix the dry rub in a small bowl: 1 teaspoon salt, ½ teaspoon pepper, 1 teaspoon garlic powder, and 1 teaspoon smoked paprika. Sprinkle this evenly over both sides of the chicken thighs. Don’t be shy—use all of it. Rub it in gently with your fingers.
- Heat your skillet over medium-high heat for about 2 minutes. Add 1 tablespoon olive oil and 1 tablespoon of the butter. Swirl the pan until the butter melts and starts to foam.
- Place the chicken thighs skin-side down in the pan. You should hear a satisfying sizzle. If you don’t, the pan isn’t hot enough. Let them cook without moving for 5-6 minutes. The skin should turn deep golden brown and release easily from the pan. If it sticks, give it another minute—it’ll let go when it’s ready.
- Flip the chicken thighs using your tongs. Cook for another 3-4 minutes on the second side. The meat side won’t brown as deeply, and that’s fine. Remove the chicken to a plate and set aside.
- Reduce the heat to medium and add the remaining 3 tablespoons of butter to the pan. Once it melts, add the minced garlic. Stir constantly for about 30-40 seconds until it’s fragrant. Do not walk away—burnt garlic turns bitter and ruins the whole dish.
- Pour in the chicken broth, scraping the bottom of the pan with a wooden spoon to release all those browned bits. This is called deglazing, and it’s where most of the flavor lives. Add the lemon juice, dried thyme, and red pepper flakes if using. Let it simmer for 1 minute.
- Return the chicken thighs to the pan, skin-side up. Spoon some of the garlic butter sauce over the tops. Don’t submerge them—you want the skin to stay exposed so it crisps up in the oven.
- Transfer the skillet to the preheated oven and bake for 18-22 minutes. Start checking at 18 minutes. The chicken is done when an instant-read thermometer inserted into the thickest part of the thigh (not touching bone) reads 165°F. I usually pull mine at 170°F for dark meat—it stays juicier at a slightly higher temp.
- Remove from the oven and let the chicken rest in the pan for 5 minutes. This lets the juices redistribute. Sprinkle with fresh parsley and serve directly from the skillet.
A few things I’ve learned the hard way: don’t crowd the pan. If your skillet is smaller, cook the chicken in two batches. Overcrowding drops the pan temperature and you’ll end up with pale, rubbery skin. Also, if the garlic starts looking too dark during the stovetop step, pull the pan off the heat immediately. It’ll continue cooking from the residual heat.
Cooking Tips & Techniques
I’ve messed up this recipe more times than I’d like to admit. Here’s what I’ve learned so you don’t have to repeat my mistakes.
Patience with the sear. The biggest mistake people make is moving the chicken too soon. That first sear is where the magic happens. Let it sit. Don’t poke it, don’t peek, don’t wiggle it. When the skin is properly browned, it will release from the pan like it’s saying goodbye politely. If you have to yank it, it’s not ready.
Garlic timing is everything. I once added the garlic to the pan and then answered my phone. Two minutes later, my kitchen smelled like a burnt offering. Garlic needs less than a minute over medium heat. Have your broth measured and ready to go before you add the garlic to the pan. That way you can pour it in immediately.
Don’t skip the resting time. I know you’re hungry. I know the house smells incredible. But cutting into those thighs right out of the oven will send all those juices running onto the cutting board instead of staying in the meat. Five minutes. Set a timer if you have to.
Use a thermometer, not a timer. Ovens run hot or cold. Chicken thighs can vary in size. A thermometer takes the guesswork out completely. I’ve pulled chicken that looked perfect on the outside only to find it raw near the bone. And I’ve overcooked thighs that looked pale but were somehow done. Trust the thermometer.
Baste if you have time. About halfway through the oven time, spoon some of that garlic butter sauce over the chicken again. It keeps the meat moist and builds up that glossy finish. I do this when I’m feeling fancy, but honestly, it’s delicious either way.
Variations & Adaptations
This recipe is forgiving, which is one of the reasons I love it. Here are some ways I’ve adapted it over the years.
Lemon Herb Version: Add the zest of one lemon along with the juice, and swap the thyme for rosemary and oregano. It brightens the whole dish and feels almost Mediterranean. I made this version for a friend who was going through a rough patch, and she texted me later saying it was the first meal she’d actually tasted in weeks.
Creamy Garlic Butter Chicken: After removing the chicken from the oven, stir in ¼ cup of heavy cream into the pan sauce. It turns into this luscious, creamy gravy that’s incredible over mashed potatoes. Fair warning: you will lick the spoon. Possibly the pan.
Spicy Honey Garlic Version: Add 1 tablespoon of honey and an extra teaspoon of red pepper flakes to the sauce before baking. The sweet heat combo is addictive. My brother-in-law, who claims he “doesn’t do spicy,” ate three thighs in one sitting.
Vegetable Add-In: Toss halved baby potatoes or thick carrot chunks into the pan around the chicken before baking. They cook in the garlic butter sauce and come out tender and flavorful. Just make sure they’re cut to roughly the same size so they cook evenly.
Dairy-Free Adaptation: Use a high-quality vegan butter stick and skip the cream variation. I’ve tested this with Miyoko’s cultured vegan butter and it worked beautifully. The sauce won’t be quite as rich, but it’s still deeply satisfying.
Serving & Storage Suggestions
This cozy one-pan garlic butter chicken thighs recipe begs for something to soak up that sauce. Here’s how I serve it.
Serving Temperature: Serve hot, straight from the skillet. The butter sauce will start to solidify as it cools, so eat it while it’s still bubbling. I put the skillet right on a trivet in the middle of the table. It makes the meal feel special without any extra effort.
What to Serve With It: Mashed potatoes are the classic choice—the creamy texture against the crispy chicken skin is heaven. Buttered egg noodles work great too. For something lighter, try steamed green beans or a simple arugula salad with lemon vinaigrette. The bitterness of the greens cuts through the richness perfectly. If you’re in the mood for something starchy, try my creamy mashed potatoes—they’re the perfect vehicle for that garlic butter sauce.
Storage: Store leftovers in an airtight container in the refrigerator for up to 4 days. The chicken will lose its crispy skin, but the flavor actually gets better as it sits. I’ve been known to eat the leftovers cold, straight from the container, standing in front of the fridge at 11 PM. No regrets.
Reheating: The best way to reheat is in a 350°F oven for about 10 minutes. This helps the skin crisp up again. The microwave works in a pinch, but the skin will be soft. If you’re reheating on the stovetop, add a splash of chicken broth to the pan to keep things from drying out.
Freezing: You can freeze the cooked chicken thighs in the sauce for up to 3 months. Thaw overnight in the refrigerator and reheat in a covered skillet over low heat. The texture won’t be quite as perfect as fresh, but it’s still miles better than takeout on a busy night.
Nutritional Information & Benefits
Let’s be real—this isn’t a health food recipe. But it does have some redeeming qualities worth mentioning.
Estimated Per Serving (1 thigh with sauce): Calories: 385, Fat: 28g, Protein: 32g, Carbs: 4g, Fiber: 0g, Sugar: 1g. These numbers will vary based on exact ingredients and portion sizes.
Health Highlights: Chicken thighs are rich in selenium, which supports thyroid function, and B vitamins, which help with energy metabolism. Garlic has been studied for its potential immune-boosting and anti-inflammatory properties. And butter, despite its reputation, contains butyrate, a fatty acid that may support gut health in moderate amounts.
Dietary Considerations: This recipe is naturally gluten-free and low-carb. For a keto-friendly version, skip the honey variation and serve with roasted vegetables instead of potatoes. It’s not dairy-free in its standard form, but the dairy-free adaptation above works well.
Allergen Note: Contains dairy (butter). If you’re using the creamy variation, that adds additional dairy. Always check your chicken broth label—some brands add wheat-based thickeners.
I’m not a nutritionist, and I don’t pretend to be. But I believe that food made with real ingredients, eaten with people you love, is good for you in ways that don’t show up on a nutrition label. This recipe falls squarely in that category.
Conclusion
This cozy one-pan garlic butter chicken thighs recipe is the kind of dish that makes you slow down. It’s not complicated, it’s not fancy, and it doesn’t try to impress anyone. It just delivers exactly what it promises: tender, juicy chicken with crackly skin, swimming in a garlic butter sauce that tastes like someone’s grandmother spent hours perfecting it.
I make this on nights when I need a reminder that simple things can be extraordinary. On days when the world feels too loud and I just want to sit in my kitchen with a glass of wine and the smell of garlic and butter filling the air. It’s become my ritual, my reset button, my way of saying “I’ve got this” even when I’m not sure I do.
Try it as written first, then make it your own. Add more garlic. Throw in some herbs. Drizzle honey if that’s your thing. The beauty of this recipe is that it’s a starting point, not a rulebook. And if you make it and think of someone from your past who taught you something about cooking or about life? Well, that’s the whole point, isn’t it.
I’d love to hear how it turns out for you. Drop a comment below and let me know what variations you tried, or tag me in your photos if you share them. And if you’re looking for another cozy one-pan meal, check out my one-pan lemon herb chicken—it’s the perfect companion to this recipe.
Now go make some dinner. You deserve it.
Frequently Asked Questions
Can I use boneless skinless chicken thighs instead?
You can, but you’ll lose some flavor and moisture. Boneless thighs cook faster—check them at about 12-15 minutes in the oven. The skinless version won’t get crispy, so consider it a different dish entirely. Still good, just not the same.
How do I prevent the garlic from burning?
Add the garlic to the pan after you’ve removed the chicken and reduced the heat to medium. Stir constantly and have your broth ready to pour in. Garlic goes from fragrant to burnt in about 45 seconds, so don’t walk away from the stove during this step.
Can I make this ahead of time?
You can prep the dry rub and mince the garlic up to a day ahead. Store the garlic in a small container in the fridge. I don’t recommend fully cooking this ahead of time, as the skin will lose its crispness. But leftovers reheat beautifully.
What if I don’t have an oven-safe skillet?
No problem. Sear the chicken in whatever skillet you have, then transfer everything to a baking dish before adding the garlic butter sauce and moving to the oven. Just make sure to scrape all those browned bits from the skillet into the dish.
How do I know when the chicken is fully cooked?
The safest way is with an instant-read thermometer. Insert it into the thickest part of the thigh without touching bone. You’re looking for 165°F minimum, though I prefer 170°F for dark meat. If you don’t have a thermometer, pierce the thickest part with a knife—the juices should run clear, not pink.
Pin This Recipe!

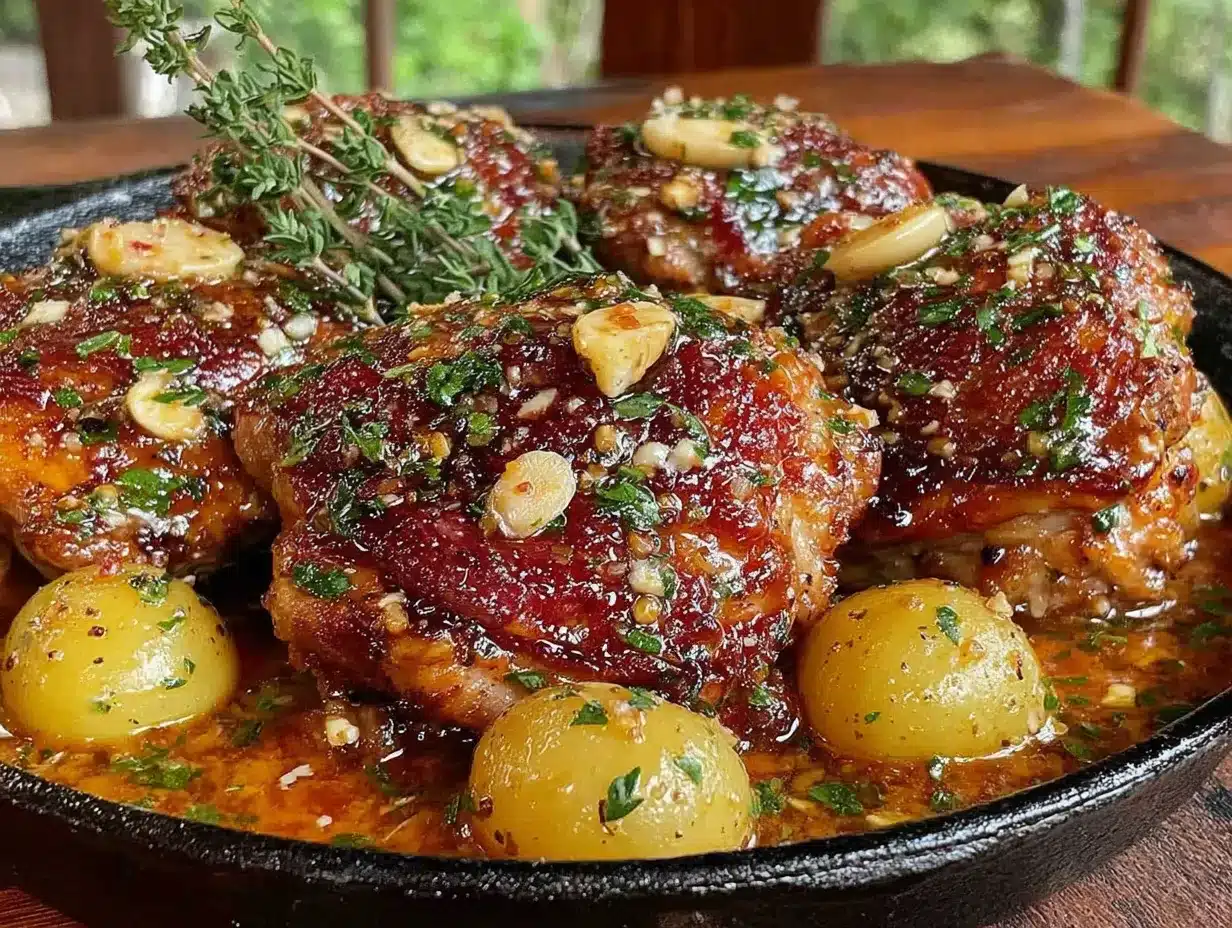
Cozy One-Pan Garlic Butter Chicken Thighs: Best Easy Dinner

Tender, juicy bone-in chicken thighs with crackly golden skin, swimming in a rich garlic butter sauce. This one-pan recipe delivers comfort food perfection in about 35 minutes with simple ingredients.
- Prep Time: 10 minutes
- Cook Time: 25 minutes
- Total Time: 35 minutes
- Yield: 6 servings 1x
- Category: Main Course
- Cuisine: American
Ingredients
- 6 bone-in, skin-on chicken thighs (about 2.5 pounds total)
- 1 teaspoon kosher salt (Diamond Crystal preferred; use ¾ teaspoon if using table salt)
- ½ teaspoon black pepper, freshly ground
- 1 teaspoon garlic powder
- 1 teaspoon smoked paprika
- 4 tablespoons unsalted butter (Kerrygold recommended)
- 8 cloves garlic, minced (fresh, not jarred)
- 1 tablespoon olive oil
- ½ cup low-sodium chicken broth
- 1 tablespoon fresh lemon juice (about half a lemon)
- 1 teaspoon dried thyme (or 2 teaspoons fresh thyme leaves)
- ½ teaspoon red pepper flakes (optional)
- 2 tablespoons fresh parsley, chopped (for garnish)
Instructions
- Preheat your oven to 400°F. Position the rack in the middle.
- Pat the chicken thighs dry with paper towels. Let them sit on the counter for about 10 minutes to air-dry slightly.
- Mix the dry rub in a small bowl: 1 teaspoon salt, ½ teaspoon pepper, 1 teaspoon garlic powder, and 1 teaspoon smoked paprika. Sprinkle evenly over both sides of the chicken thighs and rub in gently.
- Heat your skillet over medium-high heat for about 2 minutes. Add 1 tablespoon olive oil and 1 tablespoon of the butter. Swirl until the butter melts and starts to foam.
- Place the chicken thighs skin-side down in the pan. Cook without moving for 5-6 minutes until the skin is deep golden brown and releases easily.
- Flip the chicken thighs using tongs. Cook for another 3-4 minutes on the second side. Remove the chicken to a plate and set aside.
- Reduce the heat to medium and add the remaining 3 tablespoons of butter to the pan. Once melted, add the minced garlic and stir constantly for about 30-40 seconds until fragrant.
- Pour in the chicken broth, scraping the bottom of the pan with a wooden spoon to release browned bits. Add the lemon juice, dried thyme, and red pepper flakes if using. Let it simmer for 1 minute.
- Return the chicken thighs to the pan, skin-side up. Spoon some of the garlic butter sauce over the tops without submerging the skin.
- Transfer the skillet to the preheated oven and bake for 18-22 minutes. The chicken is done when an instant-read thermometer inserted into the thickest part (not touching bone) reads 165°F (or 170°F for dark meat).
- Remove from the oven and let the chicken rest in the pan for 5 minutes. Sprinkle with fresh parsley and serve directly from the skillet.
Notes
Patience with the sear is key—don’t move the chicken too soon. Garlic burns quickly, so have broth ready before adding garlic to the pan. Don’t skip the resting time. Use a thermometer for perfect doneness. For extra flavor, baste the chicken with sauce halfway through baking.
Nutrition
- Serving Size: 1 thigh with sauce
- Calories: 385
- Sugar: 1
- Sodium: 580
- Fat: 28
- Saturated Fat: 12
- Carbohydrates: 4
- Protein: 32
Keywords: garlic butter chicken, one-pan chicken, crispy chicken thighs, easy dinner, comfort food, chicken thighs recipe


